Adaptation Guide¶
This worked end-to-end walkthrough takes a phase template that ships in the library, clones it for a different unit, changes one of the actuator roles from a discrete valve to a modulating valve, deploys the new template, and runs a batch against it on the simulator.
This is the example you'd use to onboard a new colleague onto the library. Every step is concrete and runnable on a fresh reference-plant install.
What we're going to do¶
Take tank-mix (the reference plant's mix-tank
fill / agitate / drain phase) and produce a variant called
tank-mix-modulating that:
- Uses a modulating inlet valve (
analog-controlwith a fill percentage parameter) in place of the original on/off valve. This is the most common real-world adaptation. The reference plant uses cheap on/off valves, while production plants almost always have modulating valves on inlets so flow can be ramped. - Runs against a hypothetical larger vessel with a higher fill capacity (1500 L, up from the reference plant's ~500 L).
- Adds a maximum-fill safeguard by lowering the valve command to 50 % near the target level for a controlled top-off.
Then wire the new template into a one-step recipe and run a batch against it.
Prerequisites¶
You should have:
- A working install with the reference plant deployed and
dcs applyaccess to it. YAML examples below usenamespace: site-riverbendas a placeholder. Substitute your own site name. - Read Mental Models once — you should know what a PhaseTemplate, ControlModule, and MasterRecipe are.
- A skim of Phases so the YAML structure isn't a mystery.
If you can run dcs get batches and see batches, you're
ready.
Before you start, note that tank-mix is used by three recipes
today: sim-tank-blend-m1, sim-reaction-full-m1, and
sim-api-isolation-m1 (see tank-mix).
This walkthrough is careful not to break them. If you'd rather not
worry about the existing reference-plant batches, skim the notes
under Step 7 about the breaking vs. non-breaking paths.
Which interface to use¶
Every step is presented as tabs. Pick the interface that fits how you work:
- UI —
/system→ Equipment Library / Recipes, and/hmi→ Batch Execution. - CLI —
dcssubcommands (dcs recipe approve,dcs simulate, …). - YAML — author locally and apply with
dcs apply -f.
The UI flow for Steps 1–6 runs entirely inside the SFC editor.
Step 1's Duplicate action opens it pre-populated with the
source's General, CM Roles, Parameters, and action chart. Steps 2–5
edit Name, CM Roles, Parameters, and the action chart in place.
Step 6 saves. The YAML flow edits a single file end-to-end before
applying it in Step 6. Either path produces the same PhaseTemplate
resource.
Which tabs appear on a given step depends on the action. Create/edit
shows UI + YAML, imperative commands (approve, run) show UI + CLI, and
workflow steps like dcs simulate that do more than a plain apply show
all three. See
STYLE-GUIDE § Tabbed Alternatives
for the full rules. Integrators can find the REST equivalents in the
API Reference.
Step 1: open a blank template to copy into¶
You need a new template that starts from tank-mix and diverges in
a few fields. You build it up through Steps 2–5.
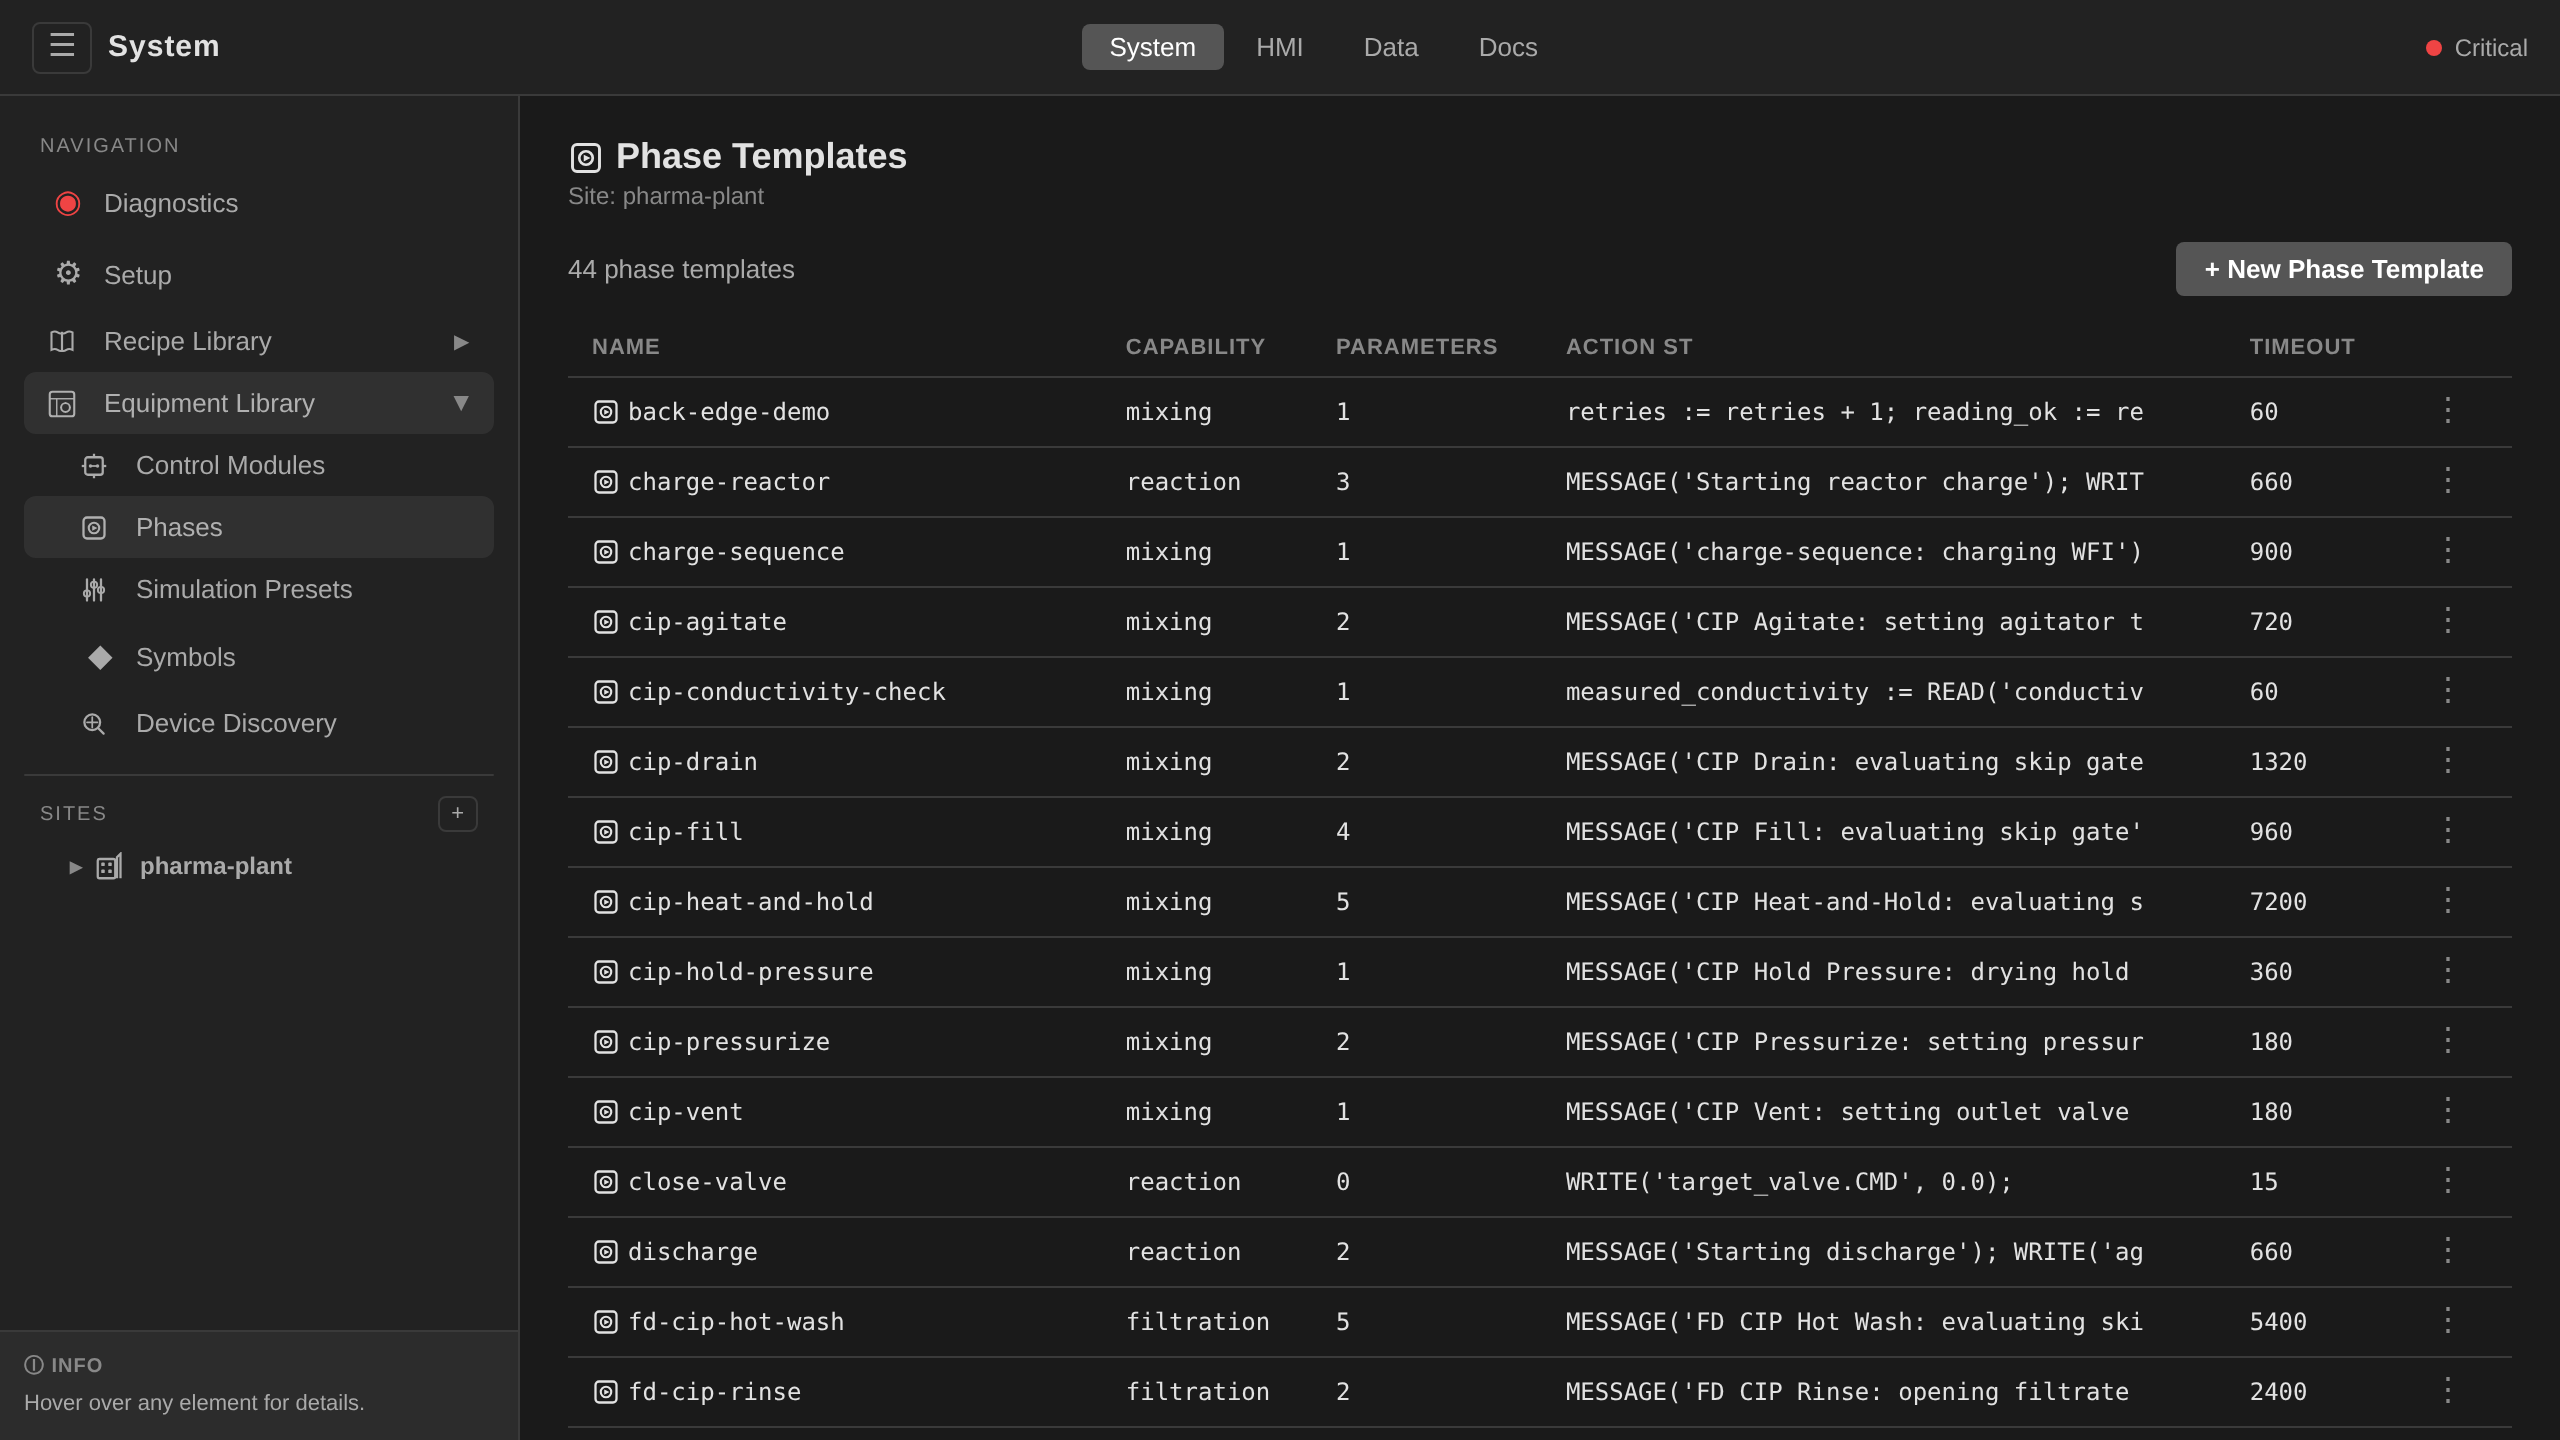
- Open
/system→ Equipment Library → Phases (site selector: your siteriverbend). - On the
tank-mixrow, open the three-dot menu and click Duplicate. The SFC editor opens pre-populated with the source's General fields, CM roles, parameters, and action chart. Name is left empty for you to fill in.
Leave the editor open. You'll fill in Name in Step 2, adjust the inlet-valve role in Step 3, widen parameter ranges in Step 5, and edit the action steps in Step 4.
Export the existing tank-mix template to a local file so you
can edit it. Two ways to do this:
# Via the CLI:
dcs get phasetemplate tank-mix -o yaml > tank-mix-modulating.yaml

# Or, if you cloned the repo, copy directly:
cp examples/riverbend/11-phase-templates.yaml /tmp/tank-mix-modulating.yaml
# ...then edit out everything except the tank-mix PhaseTemplate document.
Either way you should end up with a file that starts:
apiVersion: procedural.dcs.io/v1alpha1
kind: PhaseTemplate
metadata:
  name: tank-mix
  namespace: site-riverbend
spec:
  description: "Fill mixing tank to target level, agitate, and drain"
  capability: mixing
  cmRoles:
    - role: inlet_valve
      moduleType: discrete-valve
      description: "Tank inlet valve (on/off) for filling"
    - role: outlet_valve
      moduleType: discrete-valve
    # ... etc
Step 2: rename it¶
A new template needs a unique name. PhaseTemplate names are
namespace-scoped, so tank-mix-modulating won't collide with the
existing tank-mix.
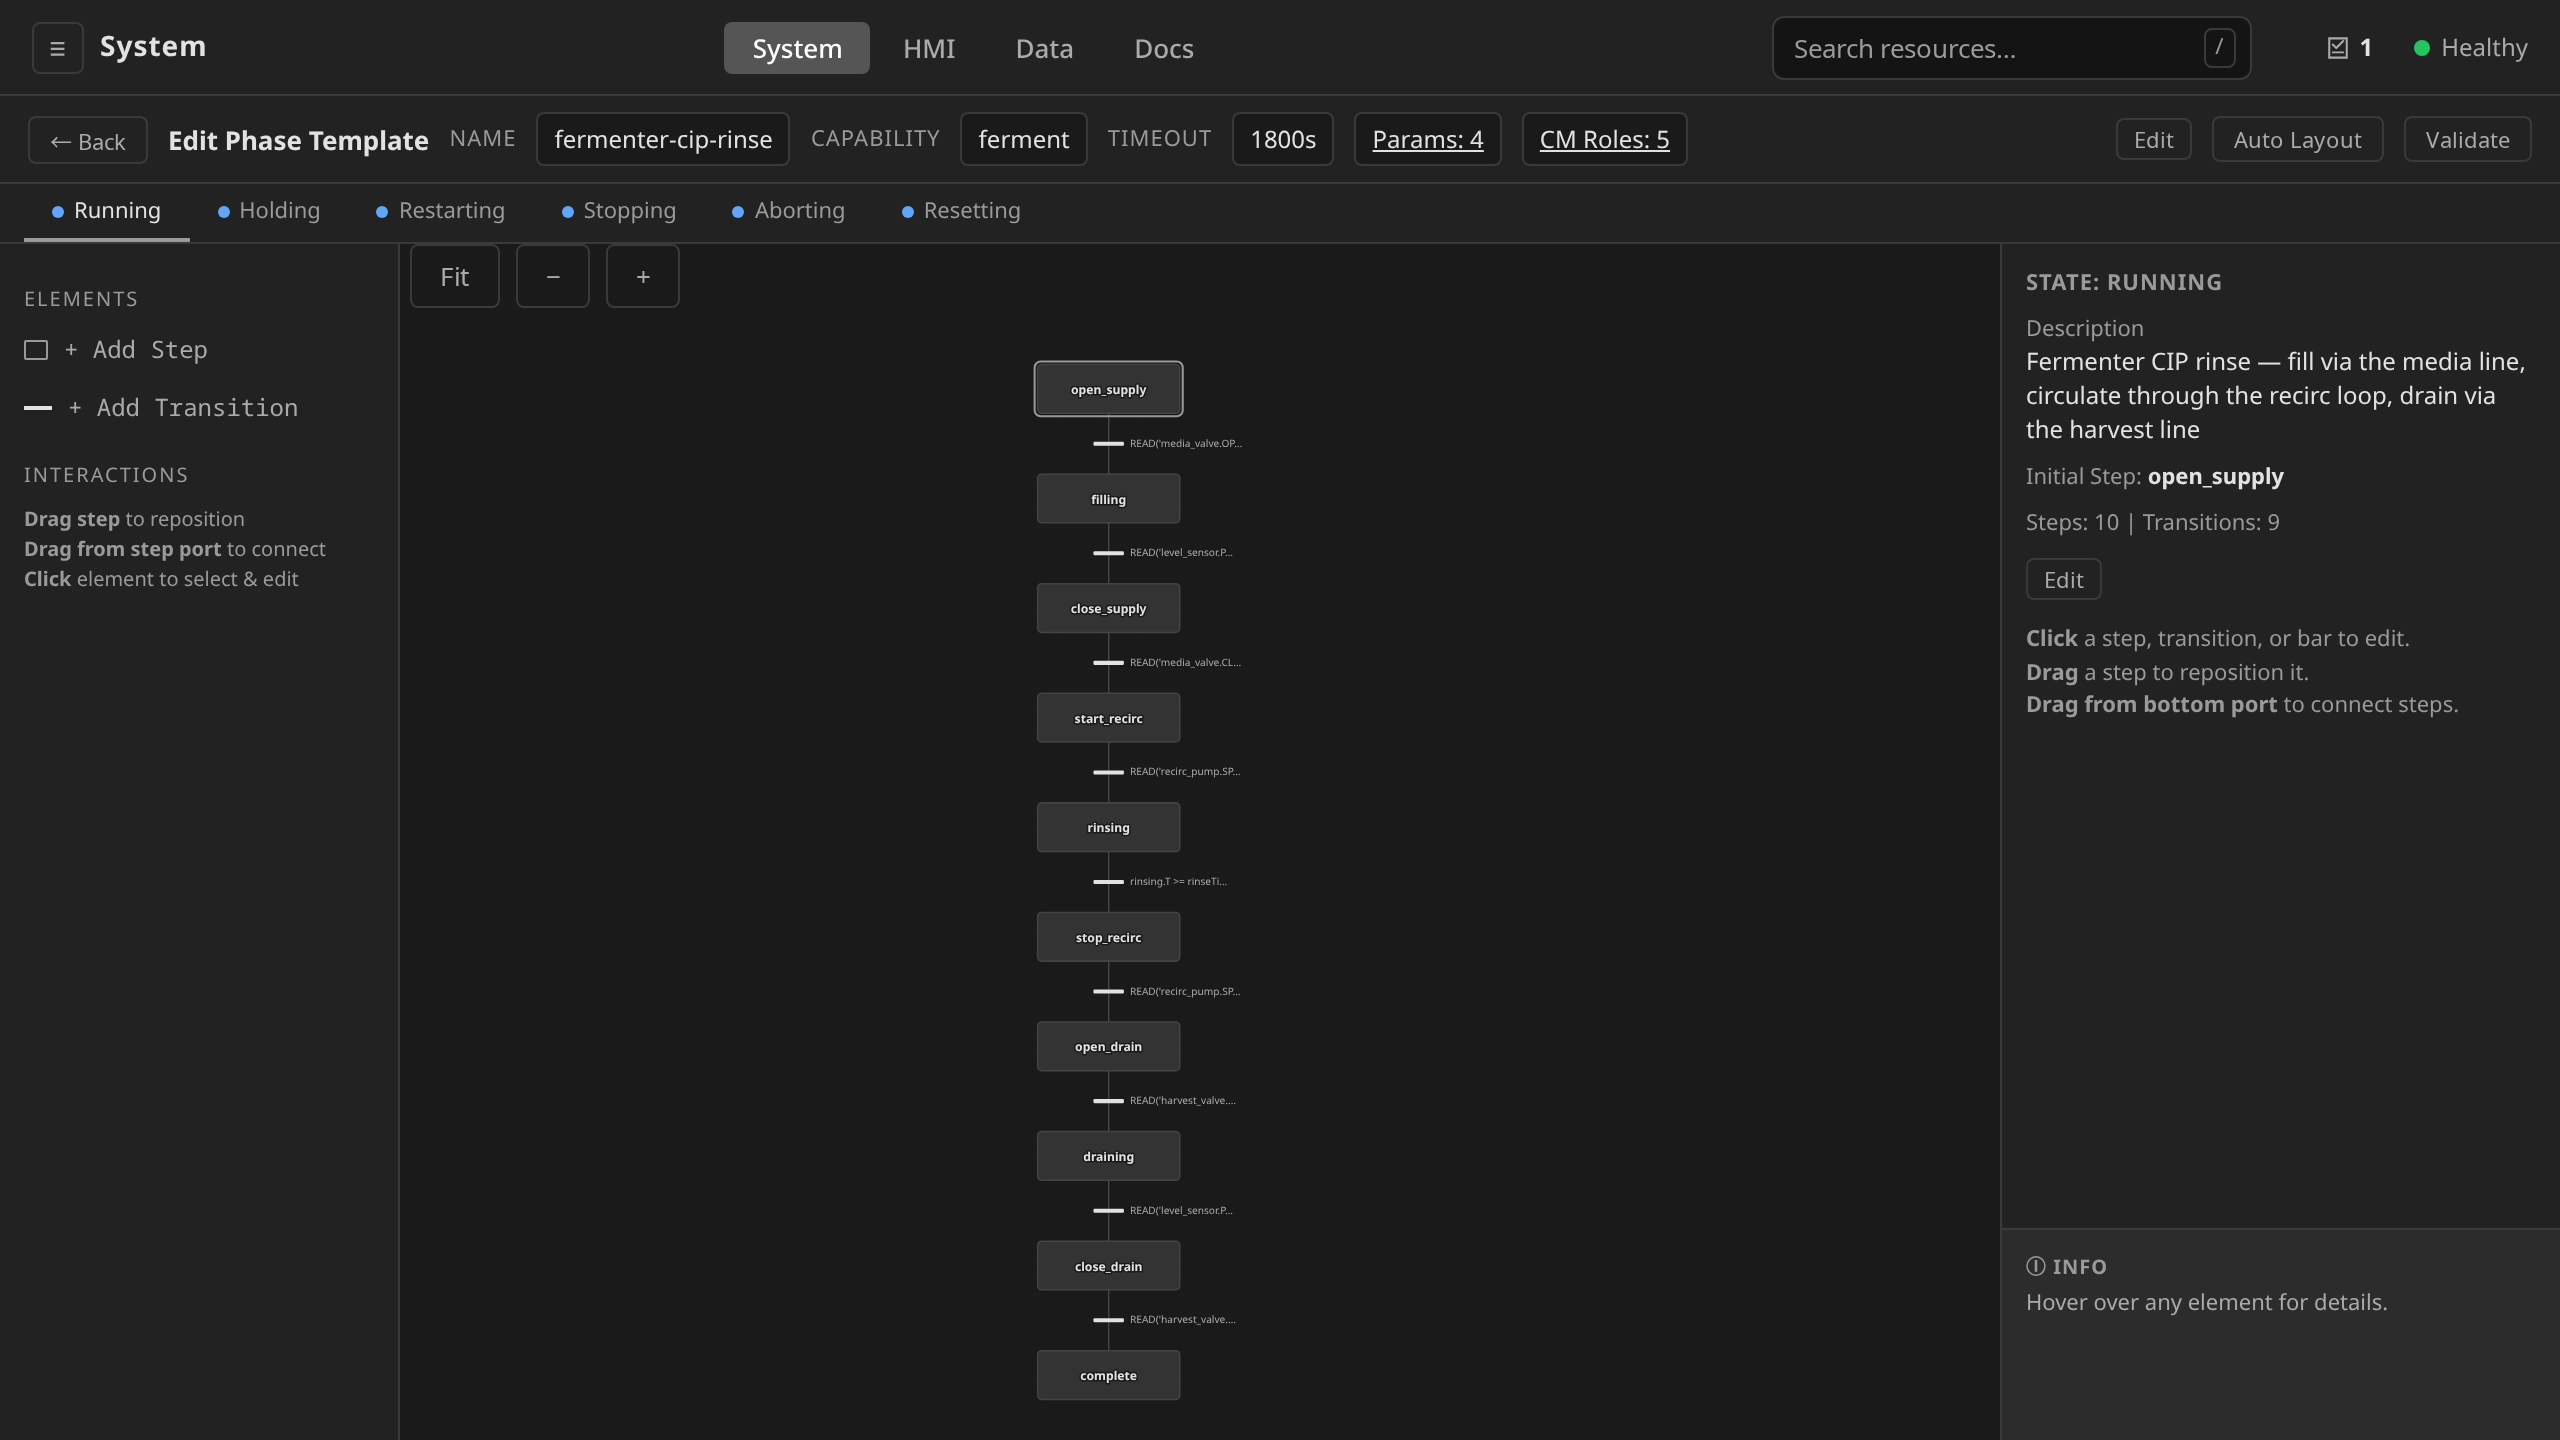
In the SFC editor toolbar (top of the page):
- Name:
tank-mix-modulating - Capability:
mixing(pre-filled from the source) - Timeout: leave at the source's value
Description is set later via the detail view if you need to refine it.
metadata:
  name: tank-mix-modulating         # was: tank-mix
  namespace: site-riverbend
spec:
  description: "Fill mixing tank with a modulating inlet valve, agitate, drain"
Both templates can coexist. Recipes pick the one they want by name. This is exactly the "templates are class-like" pattern from Mental Models. Your new template is a new class. It is not a new version of the old one.
Step 3: change the inlet valve role from discrete to analog¶
The original tank-mix declares its inlet valve as a discrete-valve
role. The modulating variant needs an analog-control role instead, so
the phase can issue percentage commands.
Click CM Roles (N) in the toolbar. The CM Roles panel expands
below it, with the chart still on screen. All four roles from
tank-mix (inlet_valve, outlet_valve, agitator,
level_sensor) are already pre-populated from the source.
Edit the inlet_valve row:
- Module Type:
analog-control(source hasdiscrete-valve) - Description:
"Tank modulating inlet valve (0-100% command)"
Leave the other three rows unchanged. Each field takes effect as you type it. Close puts the panel away and commits nothing, because there is nothing left to commit. Save in the toolbar is what writes the template.
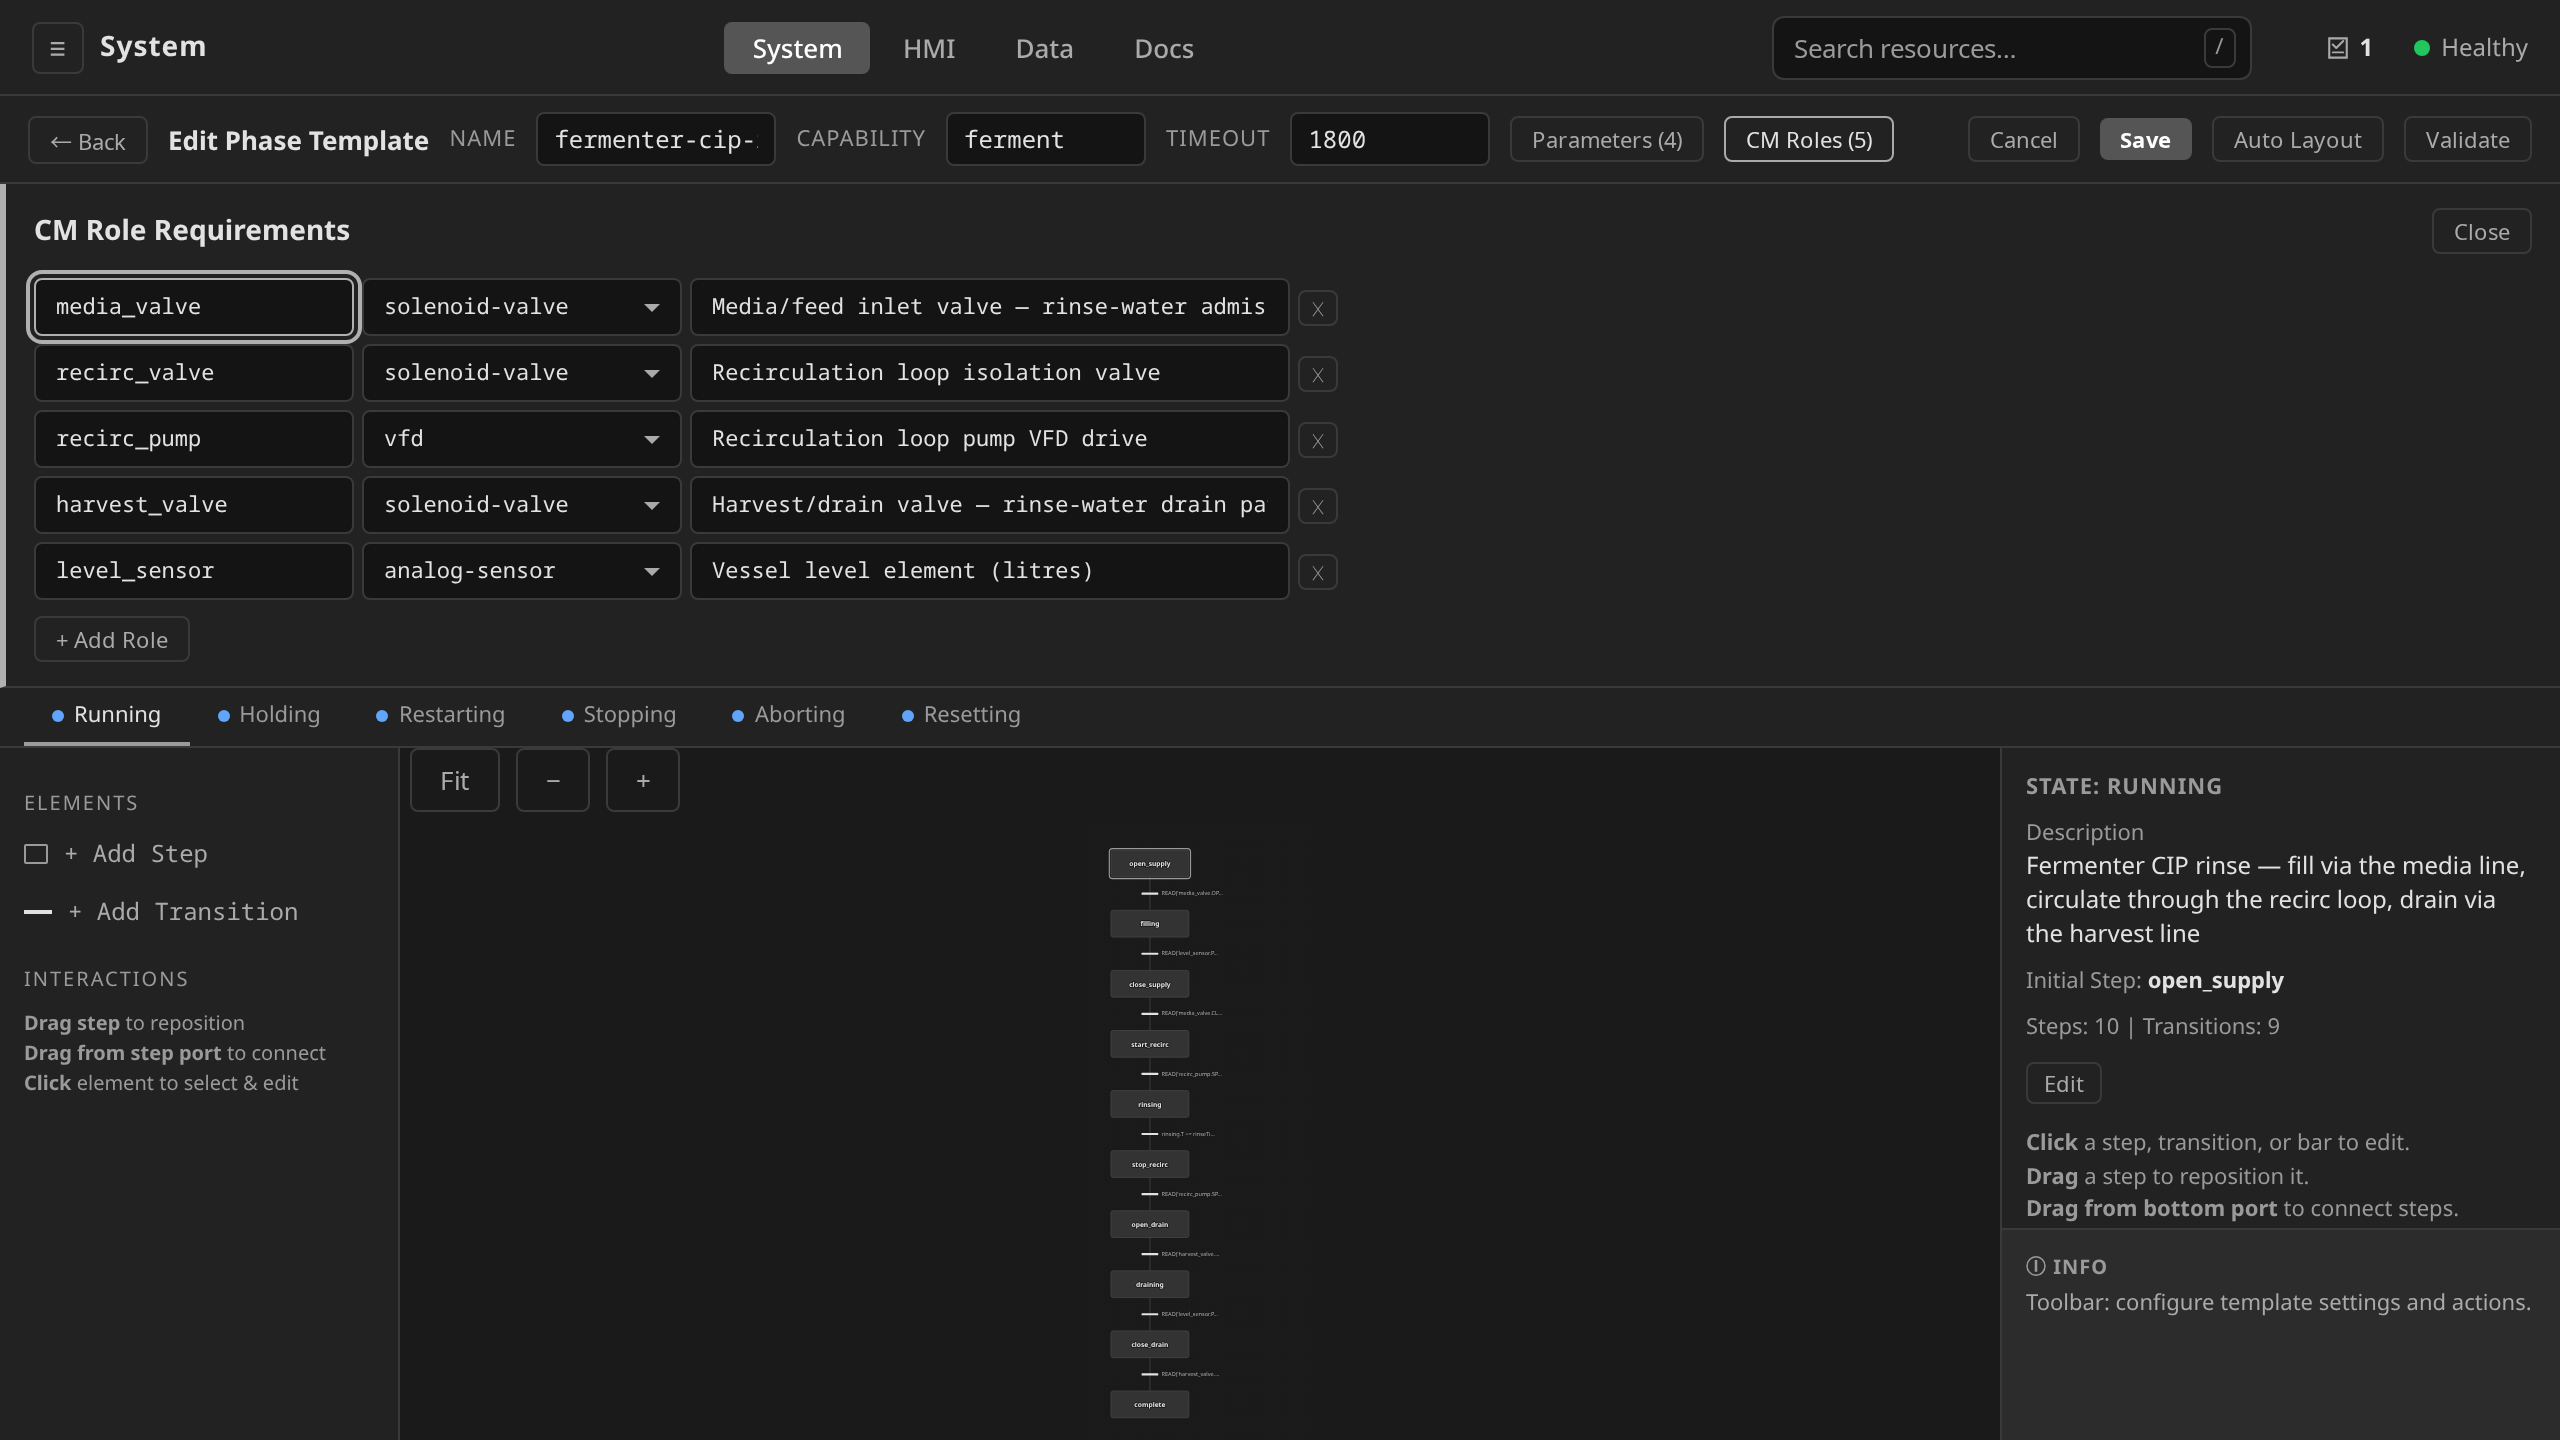
analog-control in the CM Roles panel, and the changed contract read back after the panel was closed and reopened.
The original:
cmRoles:
  - role: inlet_valve
    moduleType: discrete-valve         # ← change this
    description: "Tank inlet valve (on/off) for filling"
Change to:
cmRoles:
  - role: inlet_valve
    moduleType: analog-control          # ← was discrete-valve
    description: "Tank modulating inlet valve (0-100% command)"
This is a role contract change. The phase template now requires
the inlet_valve role to be bound to an analog-control instance,
and a discrete-valve instance no longer satisfies it. Any recipe
that uses this template
must bind inlet_valve to an analog-control ControlModule on its
target unit.
For the rest of the reference plant to keep working, leave the existing
tank-mix template alone. Only the new tank-mix-modulating
template requires the analog-control binding.
Step 4: rewrite the action steps to use a percentage command¶
The original phase wrote 1.0 to a discrete valve's CMD tag (open)
and 0.0 (closed). For the modulating variant, the phase writes a
percentage instead: a fast fill while far from target, then a slower
top-off near target.
Duplicate pre-populated the action chart with a deep copy of
tank-mix's steps and transitions, so you're editing. Nothing
here is built from scratch. Make these adaptations on the canvas:
-
Step
open-inlet→ action ST:MESSAGE('Opening inlet valve to 100%'); WRITE('inlet_valve.CMD', 100.0); -
New step
slow-fill(insert betweenfillingandclose-inlet) → action ST:MESSAGE('Approaching target — slowing inlet to 50%'); WRITE('inlet_valve.CMD', 50.0); -
Step
close-inlet→ action ST:MESSAGE('Target reached — closing inlet'); WRITE('inlet_valve.CMD', 0.0); -
Transition
open-inlet→fillingcondition:READ('inlet_valve.POS') > 5.0 - New transition
filling→slow-fillcondition:READ('level_sensor.PV') >= fill_level - 50 - New transition
slow-fill→close-inletcondition:READ('level_sensor.PV') >= fill_level - Transition
close-inlet→confirm-fillcondition:READ('inlet_valve.POS') < 2.0 - All other transitions unchanged from
tank-mix.
Save the SFC editor when done.
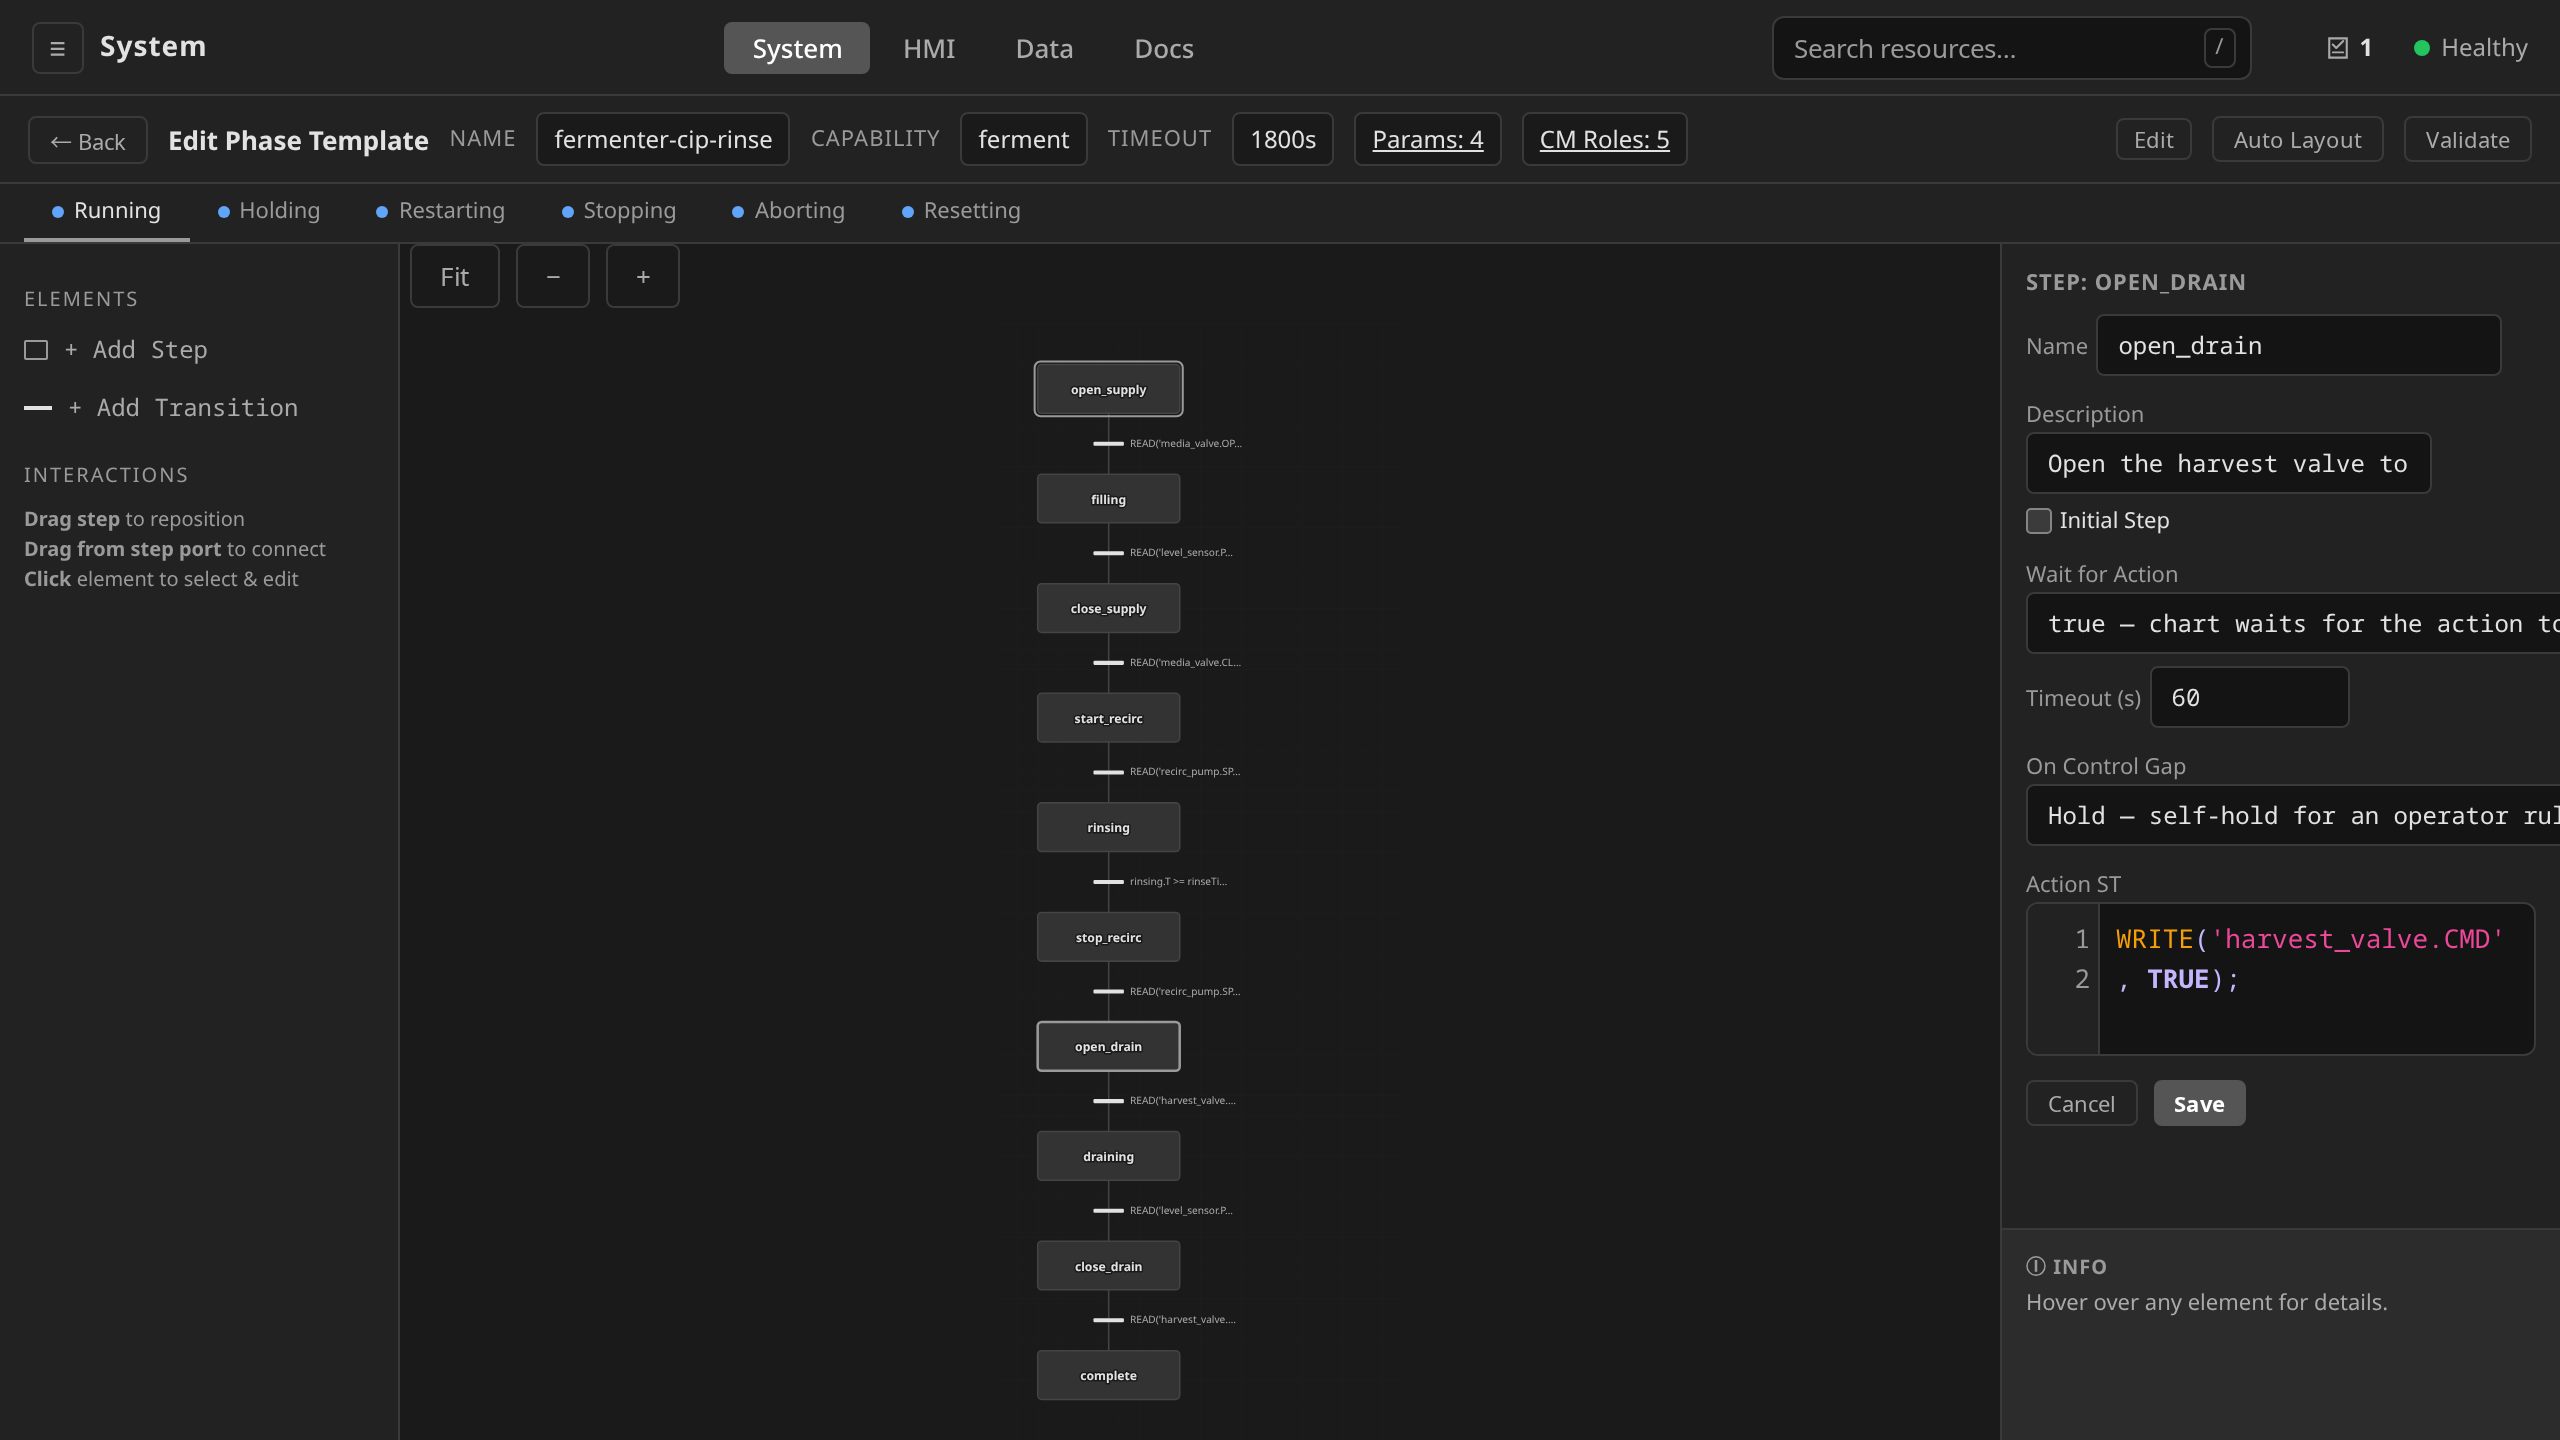
Original open-inlet step:
- name: open-inlet
actionST: |
MESSAGE('Opening inlet valve');
WRITE('inlet_valve.CMD', 1.0);
Adapted open-inlet step, opening to 100 %:
- name: open-inlet
actionST: |
MESSAGE('Opening inlet valve to 100%');
WRITE('inlet_valve.CMD', 100.0);
Add a new slow-fill step between filling and close-inlet
that ramps down to 50 % once the level reaches fill_level - 50:
- name: slow-fill
description: "Reduce inlet to 50% for controlled top-off"
actionST: |
MESSAGE('Approaching target — slowing inlet to 50%');
WRITE('inlet_valve.CMD', 50.0);
Adapted close-inlet step, writing 0 % (which is "fully closed"
for a modulating valve, the same as for a discrete valve):
- name: close-inlet
actionST: |
MESSAGE('Target reached — closing inlet');
WRITE('inlet_valve.CMD', 0.0);
Wire the new step into the transition table. The original
tank-mix has feedback-guarded transitions around open-inlet
and close-inlet (READ('inlet_valve.FB') = TRUE/FALSE). Keep
those. They confirm the actuator has actually moved before the
SFC advances. The analog valve exposes position as POS, so the
transitions guard on POS > 0 / POS < 2.0 where the original
guarded on the discrete FB boolean:
transitions:
  - fromStep: open-inlet
    toStep: filling
    conditionST: "READ('inlet_valve.POS') > 5.0"   # valve has actually opened
  - fromStep: filling
    toStep: slow-fill
    conditionST: "READ('level_sensor.PV') >= fill_level - 50"
  - fromStep: slow-fill
    toStep: close-inlet
    conditionST: "READ('level_sensor.PV') >= fill_level"
  - fromStep: close-inlet
    toStep: confirm-fill
    conditionST: "READ('inlet_valve.POS') < 2.0"   # valve has actually closed
  # ... rest of the transitions unchanged
The fast-fill phase advances to slow-fill 50 L before the target. Slow-fill advances to close-inlet exactly at the target. If the process is too noisy near the boundary, increase the gap from 50 L to 100 L, or add a deadband to the second guard.
Step 5: widen the parameter ranges for the larger vessel¶
The original tank-mix caps fill_level at 500 L. The 1500 L vessel
needs a wider range.
Click Parameters (N) in the SFC editor toolbar. The Parameters
panel expands below it, with the chart still on screen. All
parameters from tank-mix are pre-populated. Edit the fill_level
row:
- Min:
50(source has10— mechanically can't fill below 50 L) - Max:
1400(source has500— leave 100 L headspace below the brim)
Leave the other parameters unchanged. Each field takes effect as you type it. Close puts the panel away and commits nothing, because there is nothing left to commit. Save in the toolbar is what writes the template.
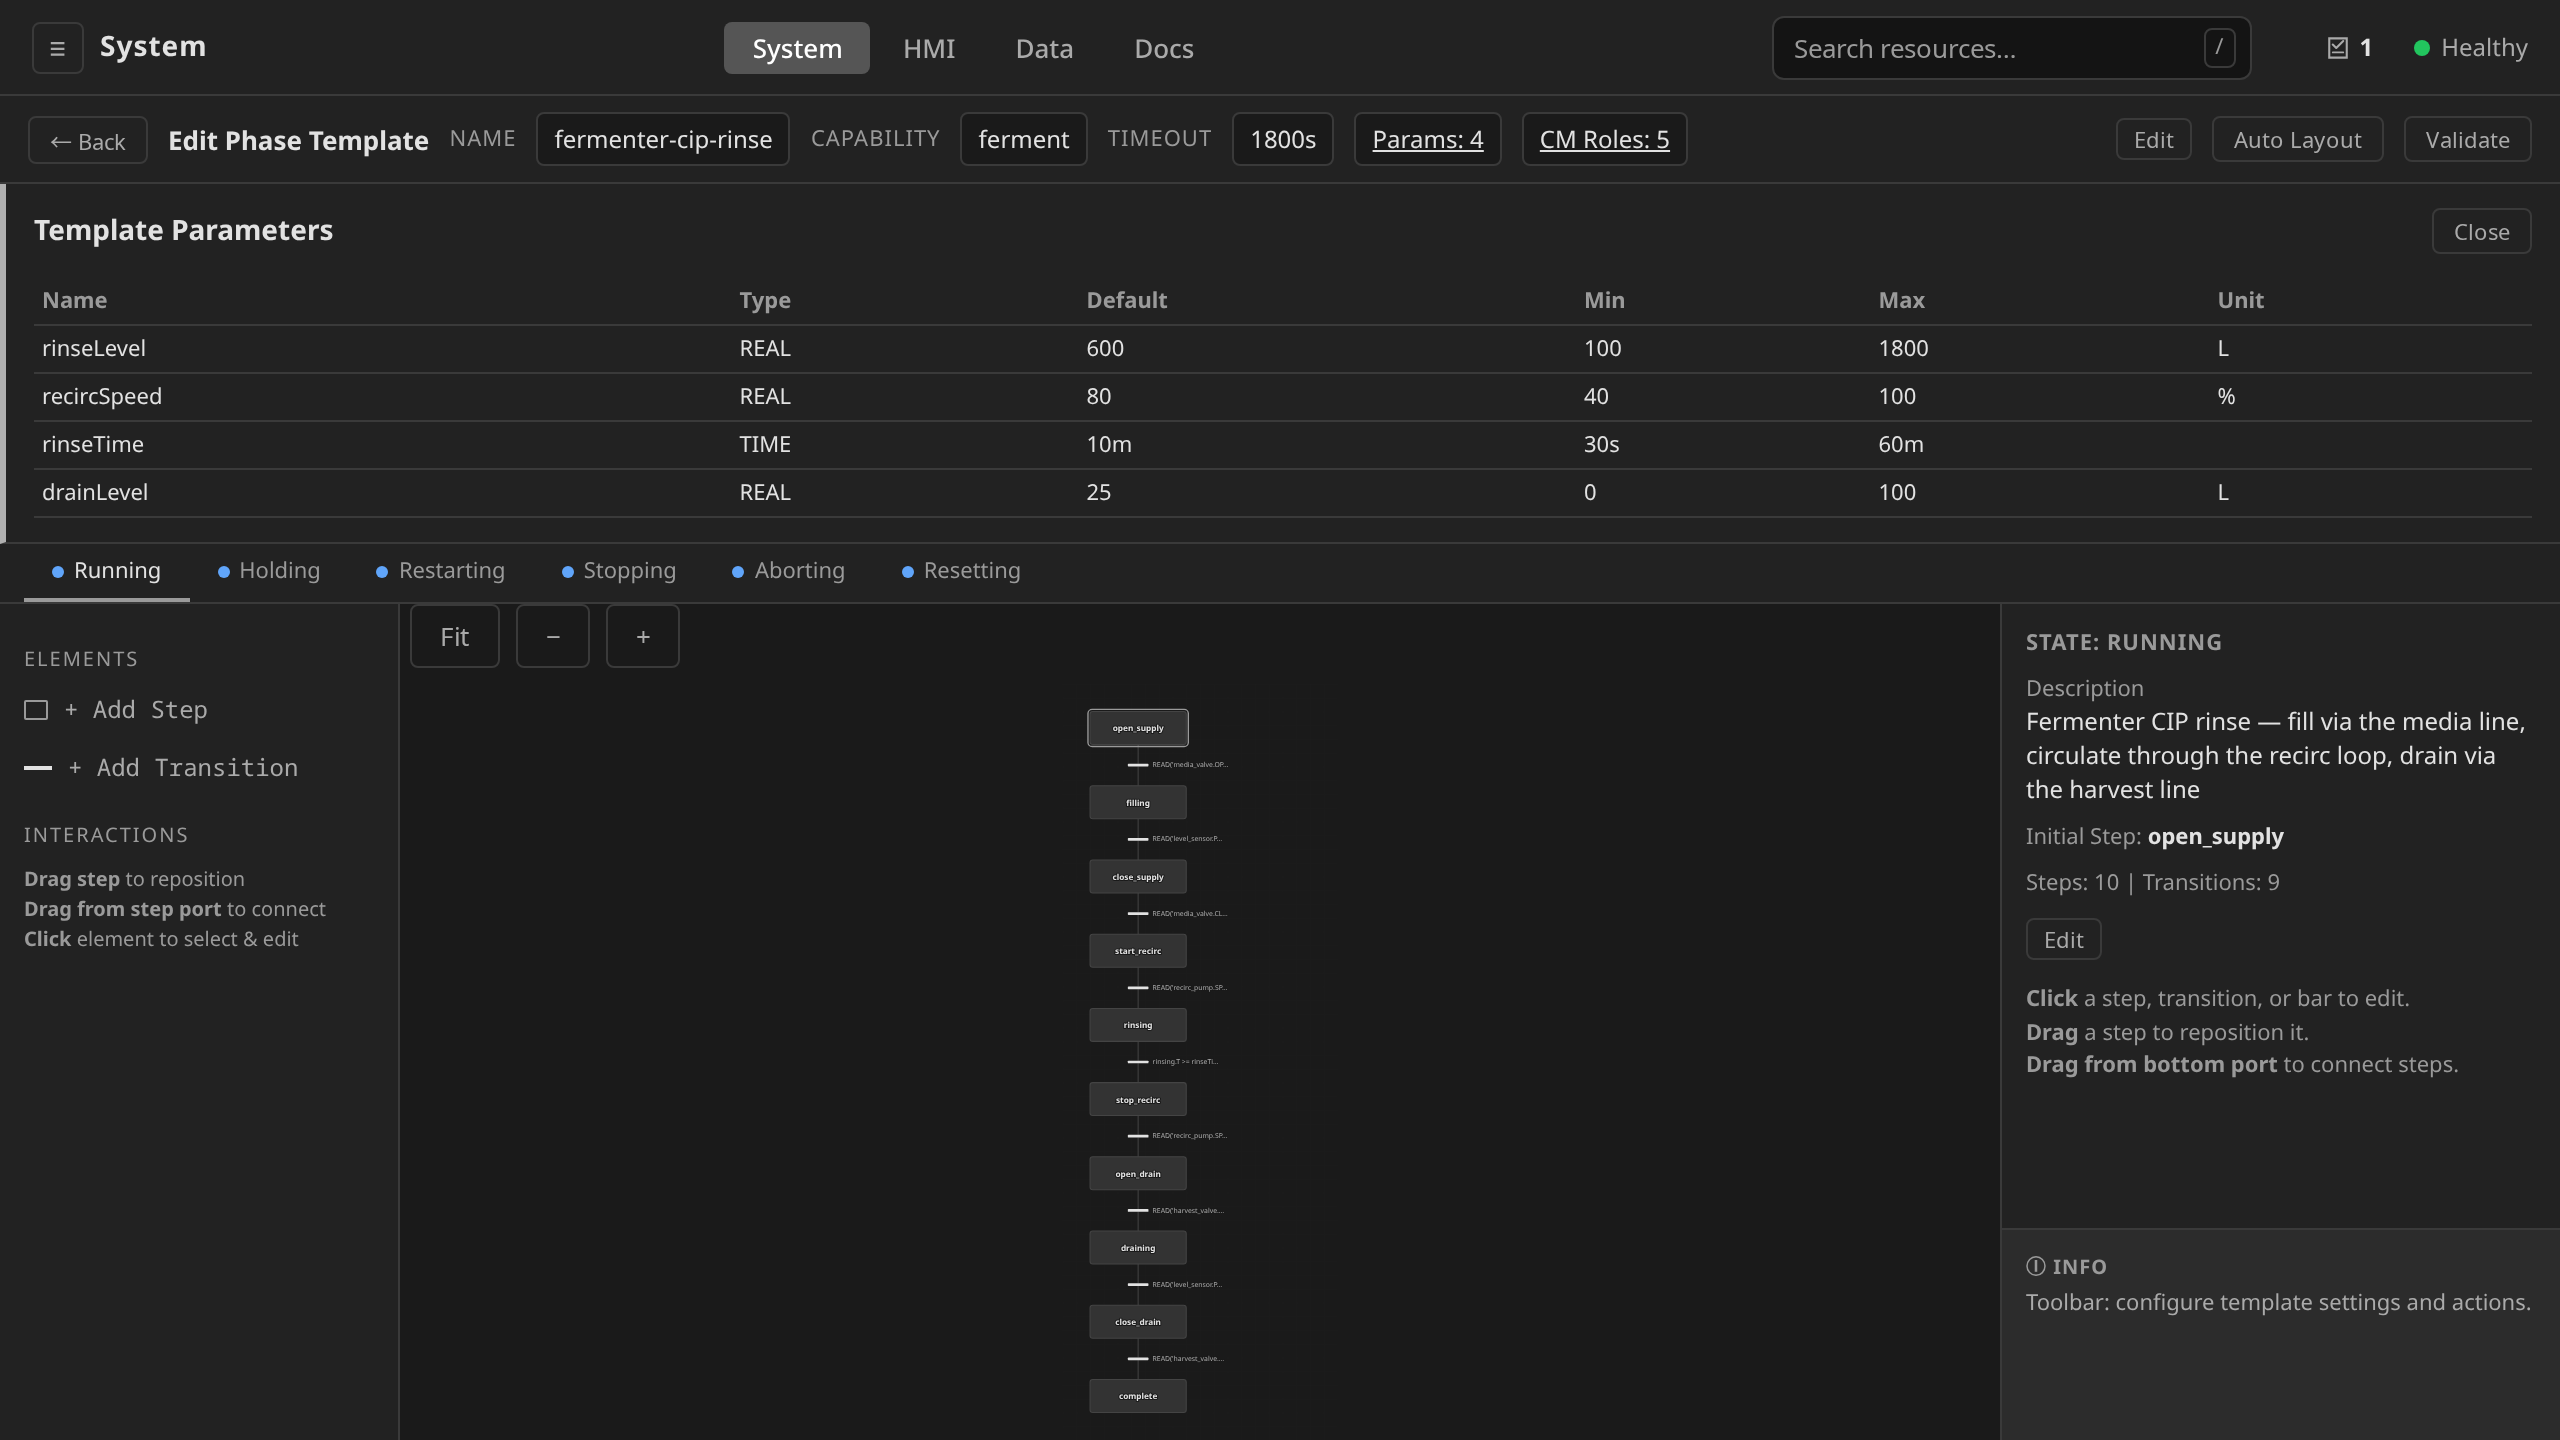
chargeTime parameter declared and added, then referenced downstream. The clip adds a new row, and this step edits an existing row's min/max. The panel and its column grammar are the same either way.
The original tank-mix caps fill_level at 500 L:
- name: fill_level
  type: REAL
  required: true
  minValue: "10"
  maxValue: "500"            # ← change this
  unit: "L"
For the 1500 L vessel:
- name: fill_level
  type: REAL
  required: true
  minValue: "50"             # mechanically can't fill below 50 L
  maxValue: "1400"           # leave 100 L headspace below the brim
  unit: "L"
These ranges are captured in the PhaseTemplate for downstream tools
such as recipe-authoring UI hints and validation reports. The
MasterRecipe controller today validates that required parameters are
bound and that referenced templates exist, but it does NOT enforce
minValue/maxValue at recipe approval. If you need a hard stop,
pair the range with an AlarmDefinition on level_sensor.PV so the
runtime catches an over-fill in real time. See
Parameter Binding for the current
enforcement boundary.
Step 6: apply the new template¶
Click Save in the SFC editor toolbar. To verify, return to
/system → Equipment Library → Phases (site:
riverbend). Both tank-mix and tank-mix-modulating
should be in the list. Hard-refresh (Ctrl+Shift+R) if
tank-mix-modulating isn't showing.
The fully-edited tank-mix-modulating.yaml file from Steps 1–5:
apiVersion: procedural.dcs.io/v1alpha1
kind: PhaseTemplate
metadata:
  name: tank-mix-modulating
  namespace: site-riverbend
spec:
  description: "Fill mixing tank with a modulating inlet valve, agitate, drain"
  capability: mixing
  cmRoles:
    - role: inlet_valve
      moduleType: analog-control
      description: "Tank modulating inlet valve (0-100% command)"
    # ... outlet_valve, agitator, level_sensor unchanged from tank-mix ...
  parameters:
    - name: fill_level
      type: REAL
      required: true
      minValue: "50"
      maxValue: "1400"
      unit: "L"
  # ... actionChart with open-inlet / filling / slow-fill / close-inlet /
  # confirm-fill / ... / done steps and the transition table from Step 4 ...
Apply:
dcs apply -f tank-mix-modulating.yaml
The Equipment Library → Phases view will show both tank-mix and
tank-mix-modulating immediately. Hard-refresh the browser tab if it
doesn't.
Step 7: provide an inlet_valve binding the new template can use¶
This is the step people miss most often. The new template requires
inlet_valve to be an analog-control instance, but the existing
reference-plant unit mix-tank-1 has its inlet valve wired to a
discrete-valve ControlModule (mt1-inlet-valve). Role binding
happens exactly once per unit. Unit.spec.cmRoles is a single
role → ControlModule map, so the new template can't coexist with
the old one on the same unit without swapping the binding or
creating a new unit.
Two options:
Option A: rebind mix-tank-1 (breaking). Create a new
analog-control ControlModule, then update mix-tank-1.spec.cmRoles
to point inlet_valve at it. The original tank-mix template now
fails its role-contract check on this unit, so sim-tank-blend-m1
and other recipes that use tank-mix on mix-tank-1 will no longer
run. This is fine if you're done with the reference-plant recipes,
but don't do it on a shared cluster.
Option B: clone the unit (non-breaking). Create a new unit
(mix-tank-1b) with its own cmRoles, including an analog-control
inlet valve. The original mix-tank-1 is untouched and existing
recipes keep working. The new recipe targets the clone unit. This is
the path used here.
Two new resources are needed: an analog-control ControlModule
whose tagBindings point at unused simulator channels, and a cloned
Unit whose cmRoles.inlet_valve references the new CM. Use the
tag keys the analog-control template declares: position_fb
(input) and valve_out (output). See
analog-control.
-
Create the ControlModule.
/system→ Equipment Library → Control Modules → + New Control Module. Fill in:- Name:
mt1b-inlet-valve - Template:
analog-control - Parent Unit:
mix-tank-1b(you'll create it next, and the field lets you forward-reference) - Tag bindings:
position_fb→tank-sim:analog.9,valve_out→tank-sim:analog.10
Click Save.
- Name:
-
Create the Unit. → Units → + New Unit:
- Name:
mix-tank-1b - Process cell:
sim-cell - Mode:
Automatic - Node selector:
kubernetes.io/hostname=dcs-demo - Runtime ports: health
61063, gRPC61163, metrics61263(unique per unit, so this clone can't reuse mix-tank-1's ports) - Capabilities: add
mixingwithmaxRPM=100,maxVolume=1500 - CM roles:
inlet_valve=mt1b-inlet-valve,outlet_valve=mt1-outlet-valve,agitator=mt1-agitator,level_sensor=mt1-level-sensor
Click Save.
- Name:
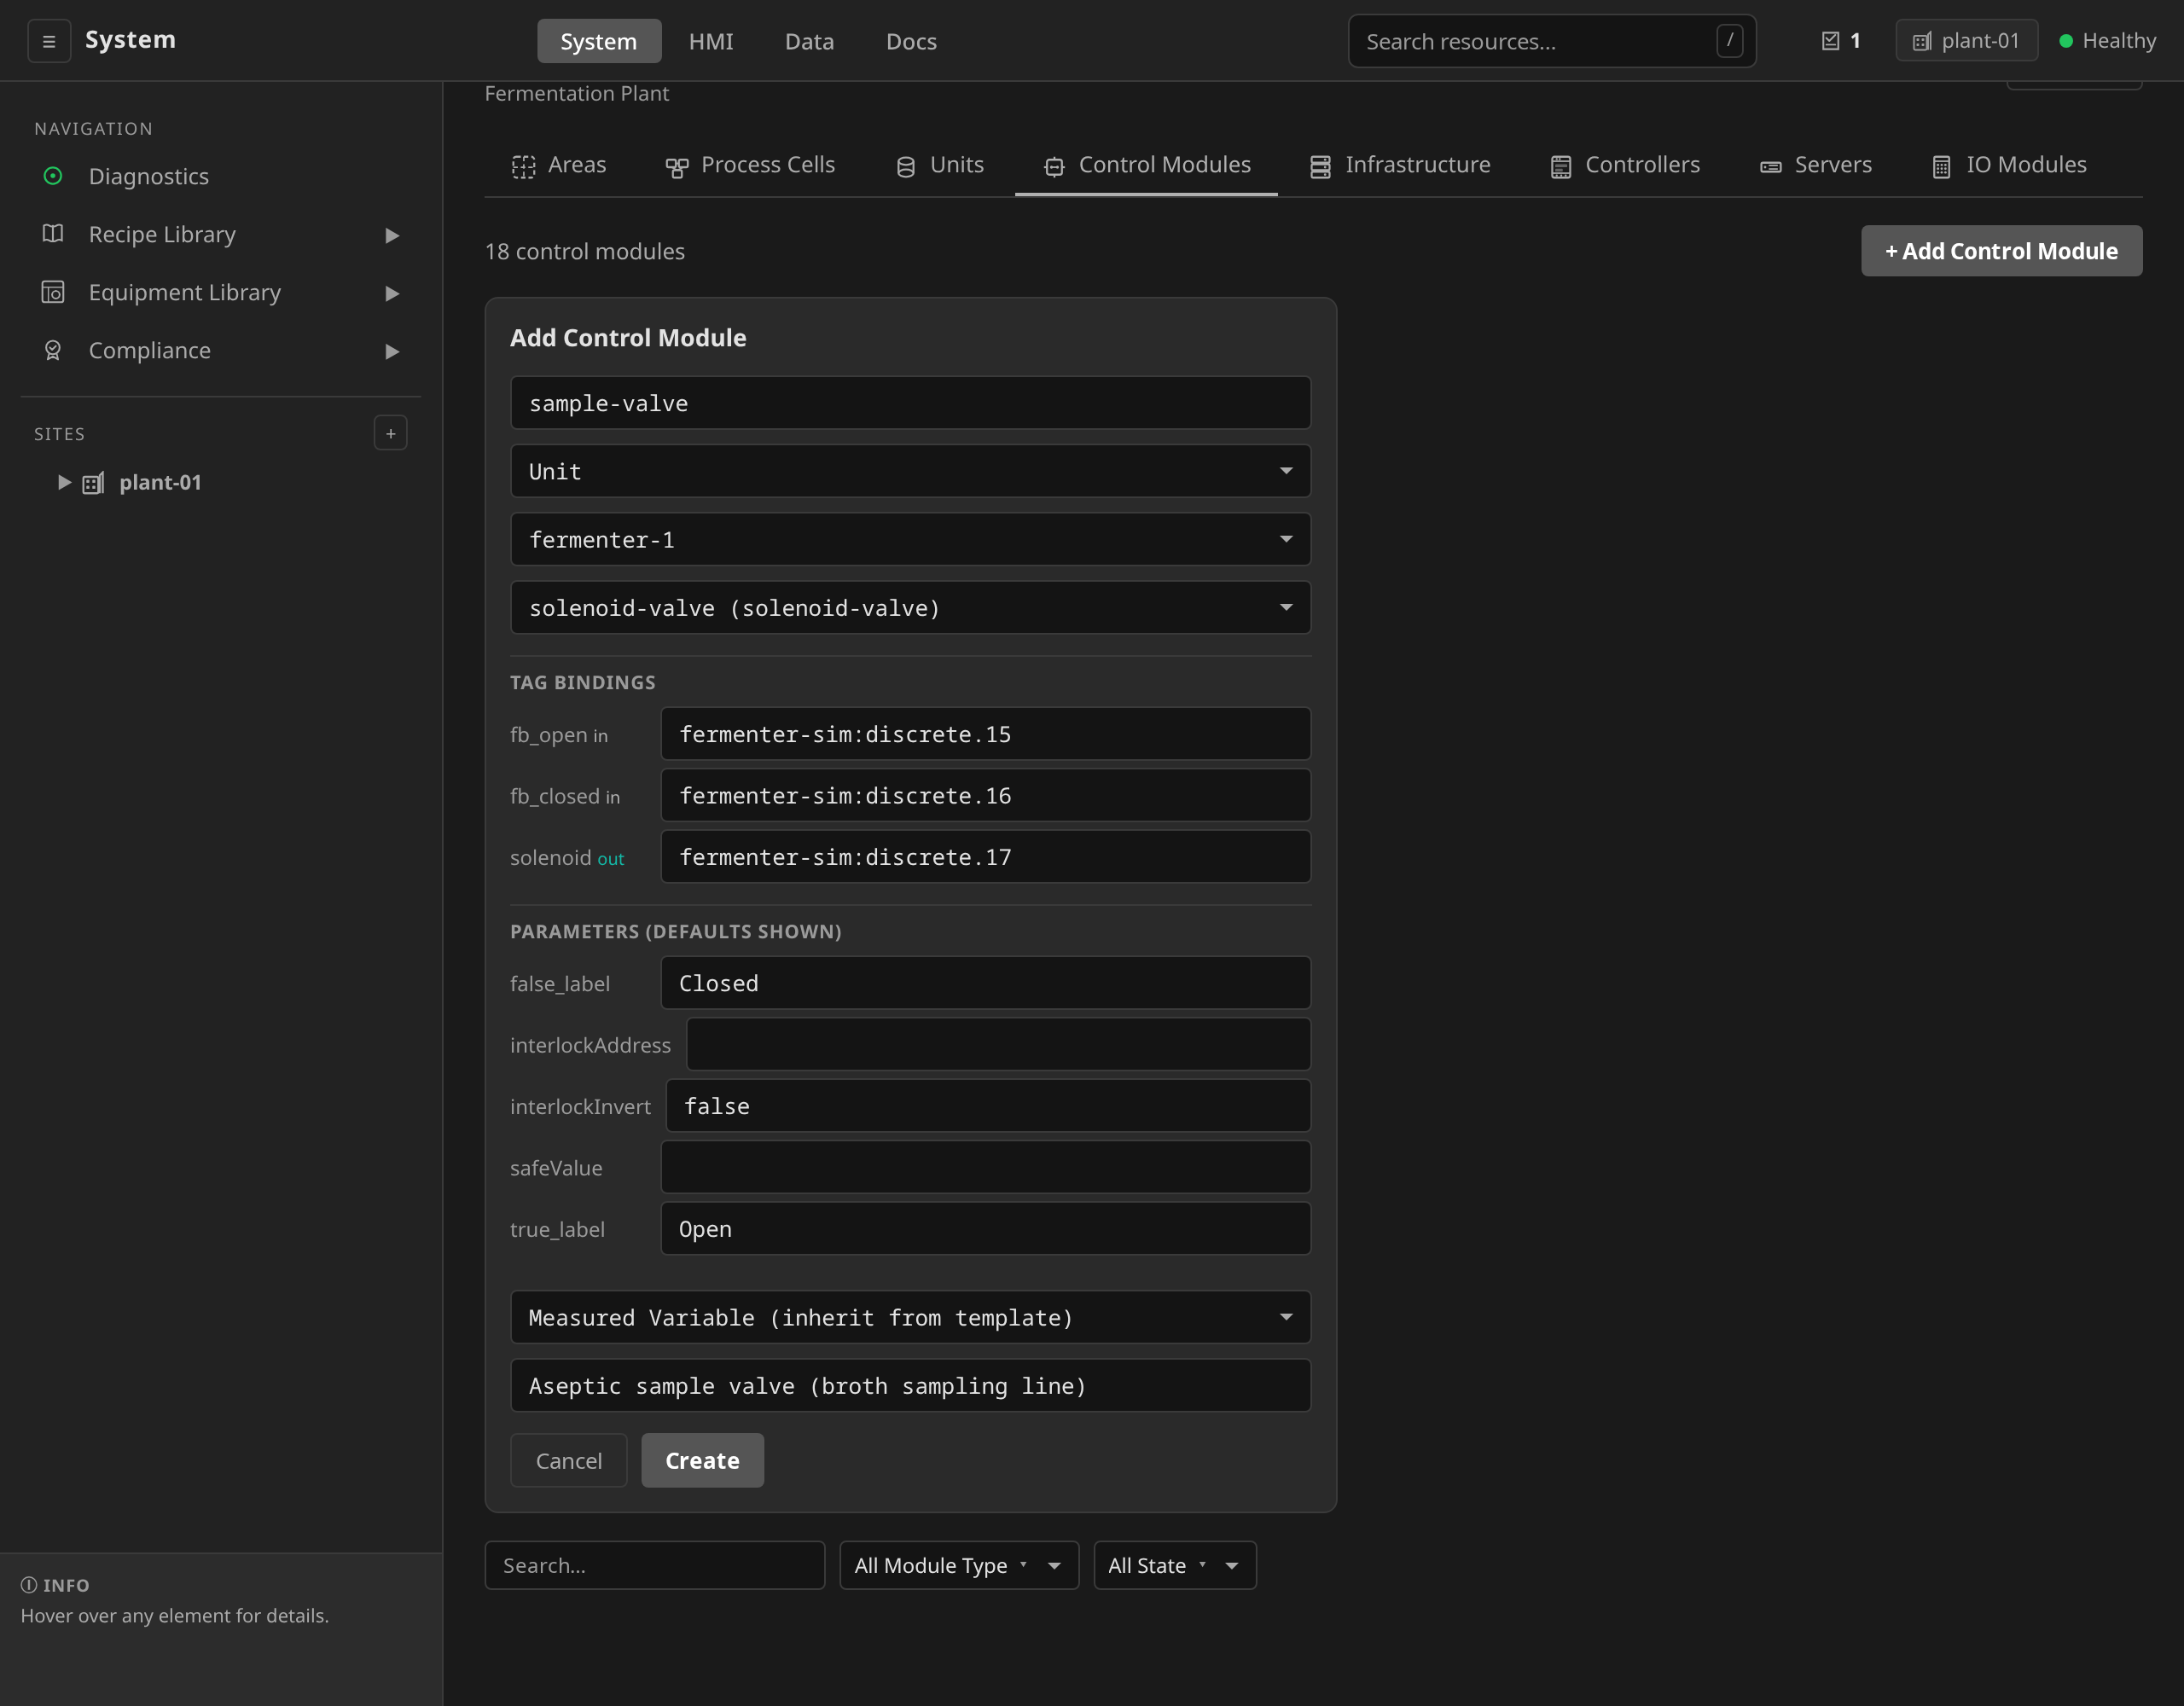
iomodule:channel string, and the instance polling real values seconds after Create. The clip instantiates an analog sensor where this step creates a valve, and it creates no Unit. The Unit half of this step stays with the form above.
# tank-mix-modulating-cm.yaml
apiVersion: physical.dcs.io/v1alpha1
kind: ControlModule
metadata:
  name: mt1b-inlet-valve
  namespace: site-riverbend
spec:
  parentName: mix-tank-1b
  parentKind: Unit
  description: "Mix-tank-1b modulating inlet valve"
  templateRef: analog-control
  tagBindings:
    position_fb: "tank-sim:analog.9"   # unused analog input
    valve_out:   "tank-sim:analog.10"  # unused analog output
In the cloned Unit's role map, the only role that changes is
inlet_valve. Everything else points at a fresh set of CMs
you'd define alongside (mt1b-level-sensor, etc.), omitted
here for brevity. A minimal definition for just the role change:
# mix-tank-1b.yaml
apiVersion: physical.dcs.io/v1alpha1
kind: Unit
metadata:
  name: mix-tank-1b
  namespace: site-riverbend
spec:
  description: "Mix-tank clone with modulating inlet valve"
  processCellName: sim-cell
  mode: Automatic
  nodeSelector:
    kubernetes.io/hostname: dcs-demo
  runtimeHealthPort: 61063       # unique per unit (hostNetwork pod)
  runtimeGRPCPort:   61163       # unique per unit
  runtimeMetricsPort: 61263      # unique per unit
  capabilities:
    - name: mixing
      type: mixing
      parameters:
        maxRPM: "100"
        maxVolume: "1500"
  cmRoles:
    inlet_valve:  mt1b-inlet-valve   # analog-control, the new one
    outlet_valve: mt1-outlet-valve   # reusing the original reference-plant CMs
    agitator:     mt1-agitator       # for the rest of the roles
    level_sensor: mt1-level-sensor
Apply both (Unit first so the CM's parentName forward-reference
resolves):
dcs apply -f mix-tank-1b.yaml
dcs apply -f tank-mix-modulating-cm.yaml
Verify:
Equipment Library → Control Modules shows mt1b-inlet-valve
with templateRef: analog-control. Units shows mix-tank-1b
alongside mix-tank-1.
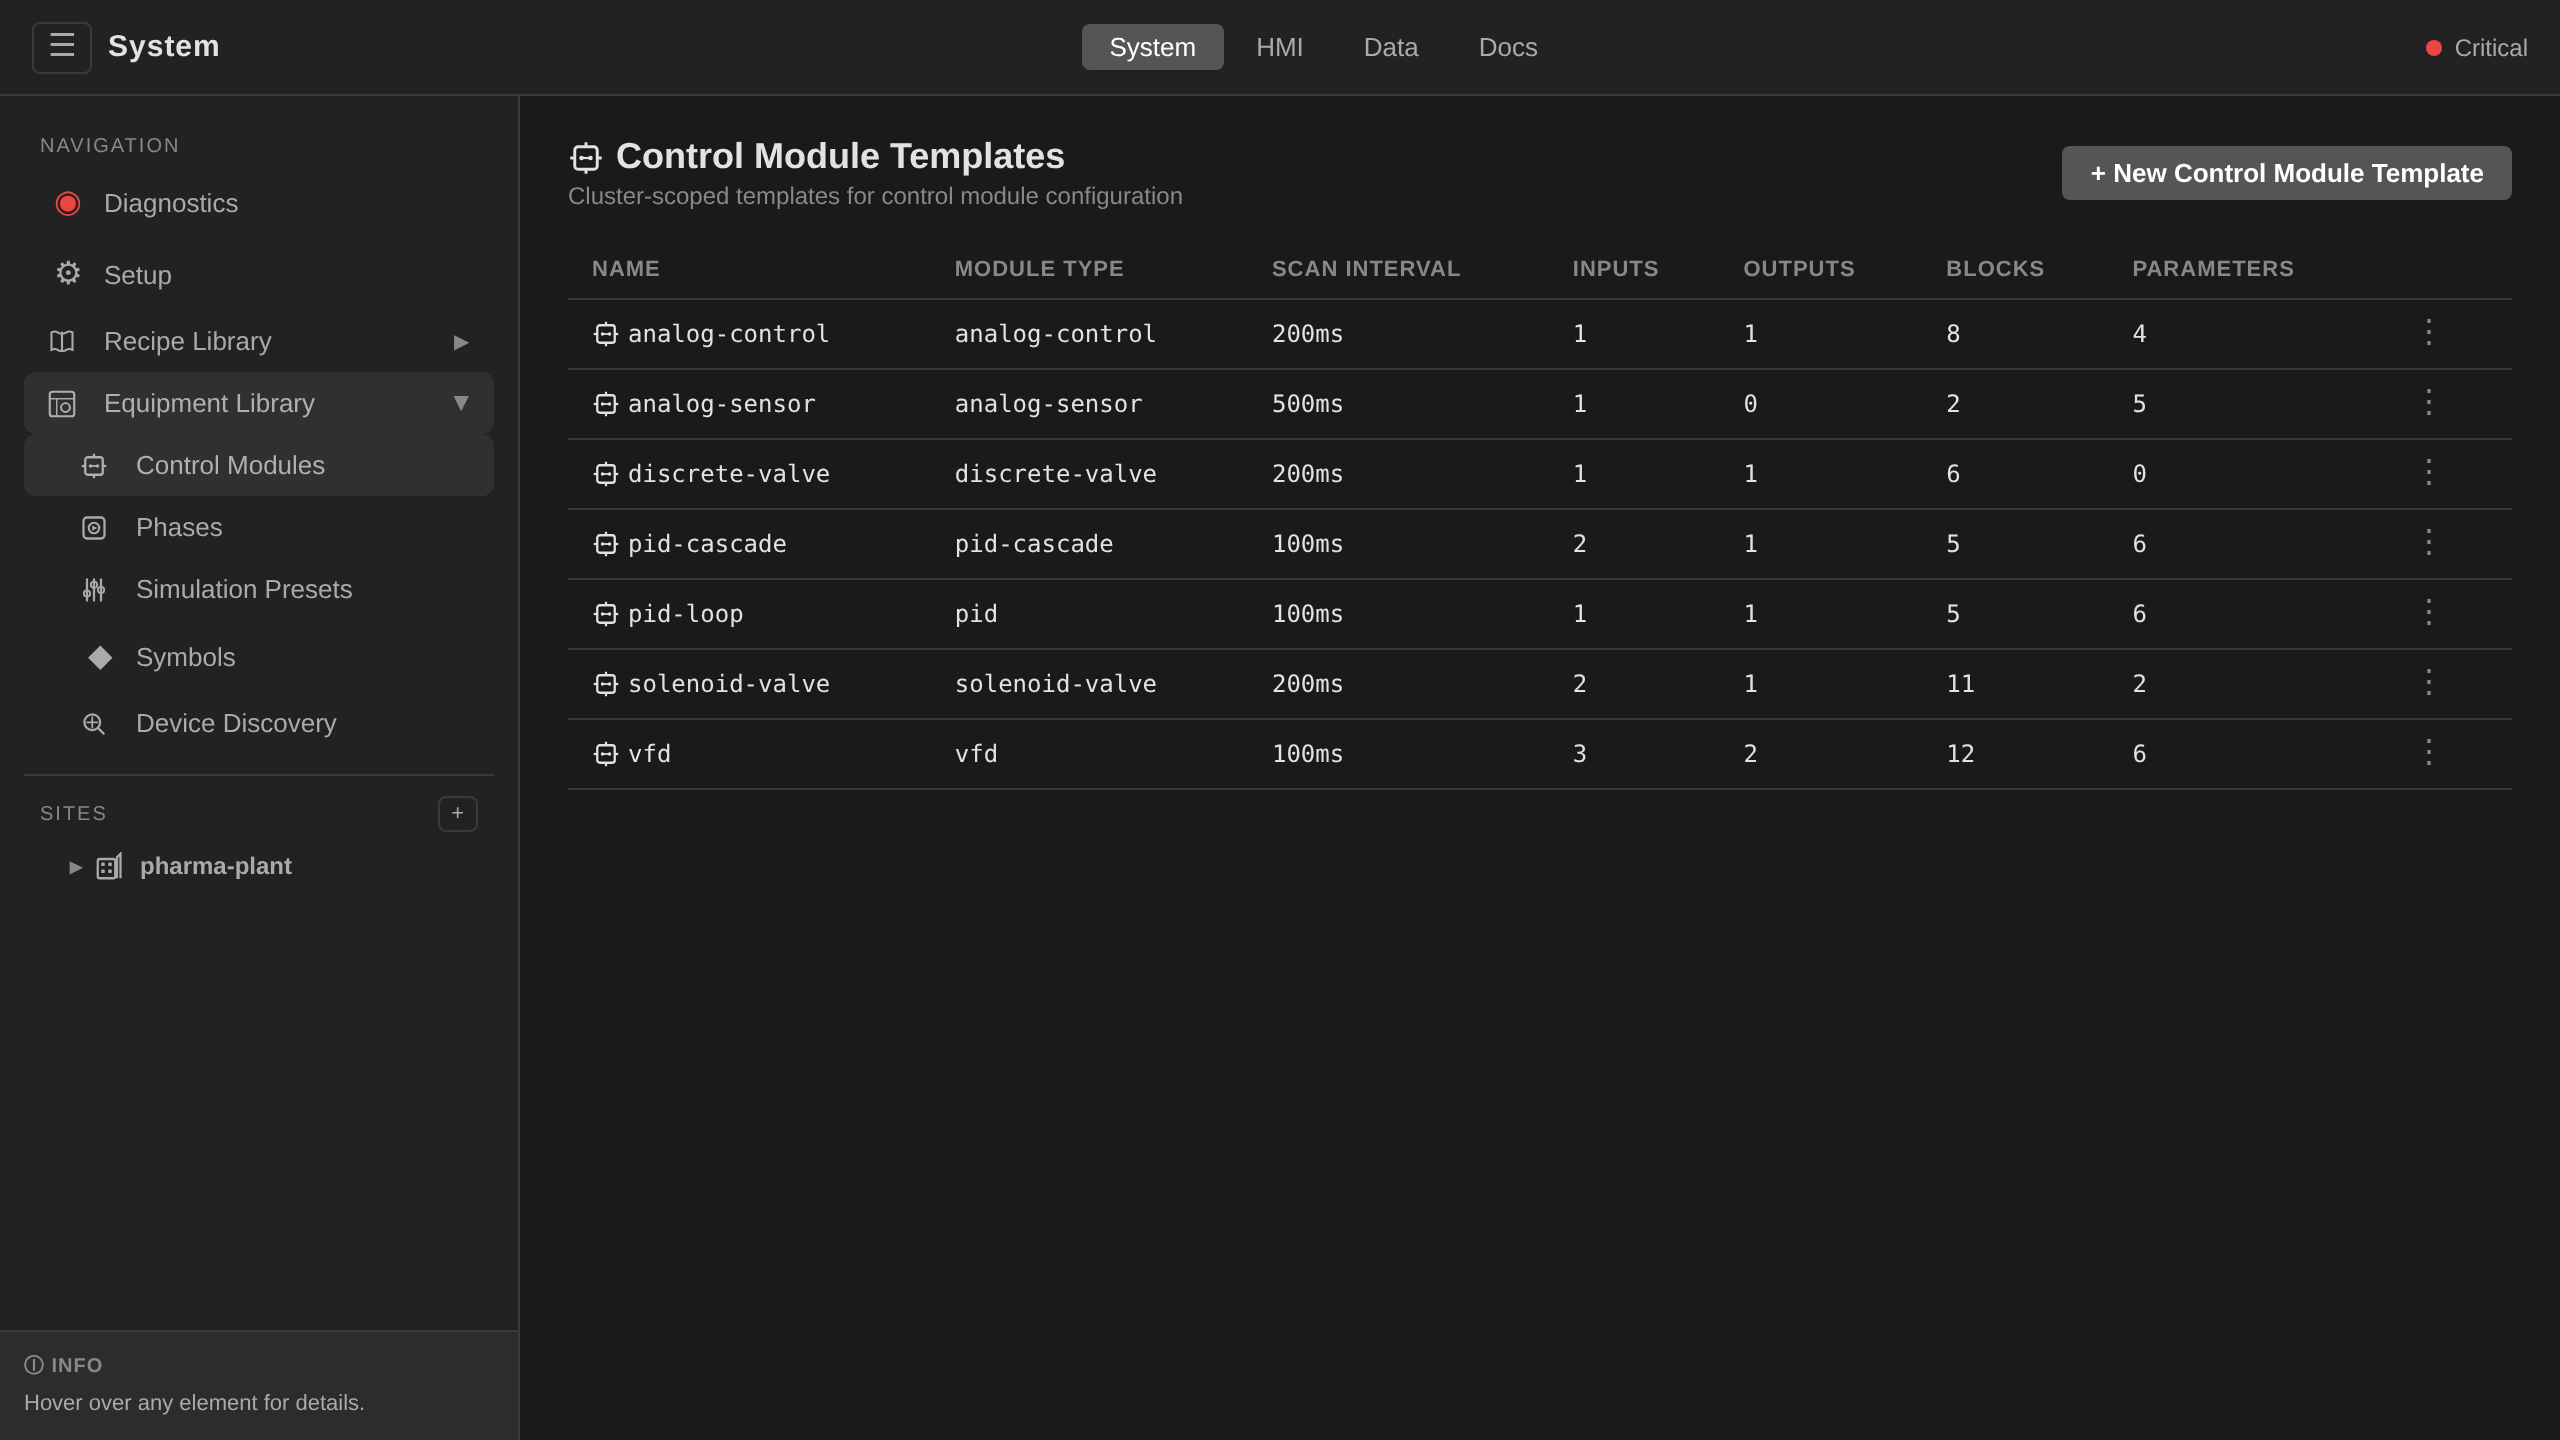
dcs get controlmodules
dcs get units
You should see mix-tank-1b alongside mix-tank-1, and
mt1b-inlet-valve with templateRef: analog-control.
Step 8: write a recipe that uses the new template¶
This step writes a minimal one-step master recipe that calls the new
phase. Note the field shapes: the procedure lives under
procedure.chart (not sfcChart), steps use templateRef +
templateKind, and unit selection is driven by
targetUnits[capability] at the recipe level. A step just references
the capability via targetCapability.
/system → Recipes → + New Master Recipe. Fill
in each section of the edit form:
- Metadata header:
- Name:
tank-mix-mod-test - Description:
Test the modulating tank-mix variant - Product name / ID:
Test Mix/TEST-MOD-001 - Version:
1.0.0
- Name:
- Header: batch size
800 L, min100, max1400. - Target: process cell
sim-cell, capabilitymixing→ unitmix-tank-1b(the clone from Step 7). - Parameters (formal parameters the operator sets per batch):
fillLevelREAL, default800, range50–1400, unitLagitatorSpeedREAL, default50mixDurationTIME, default1m30sdrainLevelREAL, default5
-
Procedure chart: initial step
mix, one stepmixthat referencestank-mix-modulating/ PhaseTemplate / capabilitymixing. Under Parameter bindings map each formal parameter to the phase template's template parameter:Template parameter Bound to fill_levelfillLevelagitator_speedagitatorSpeedmix_durationmixDurationdrain_leveldrainLevel
Click Save. The recipe appears in the Master Recipes list in
its initial Draft state.
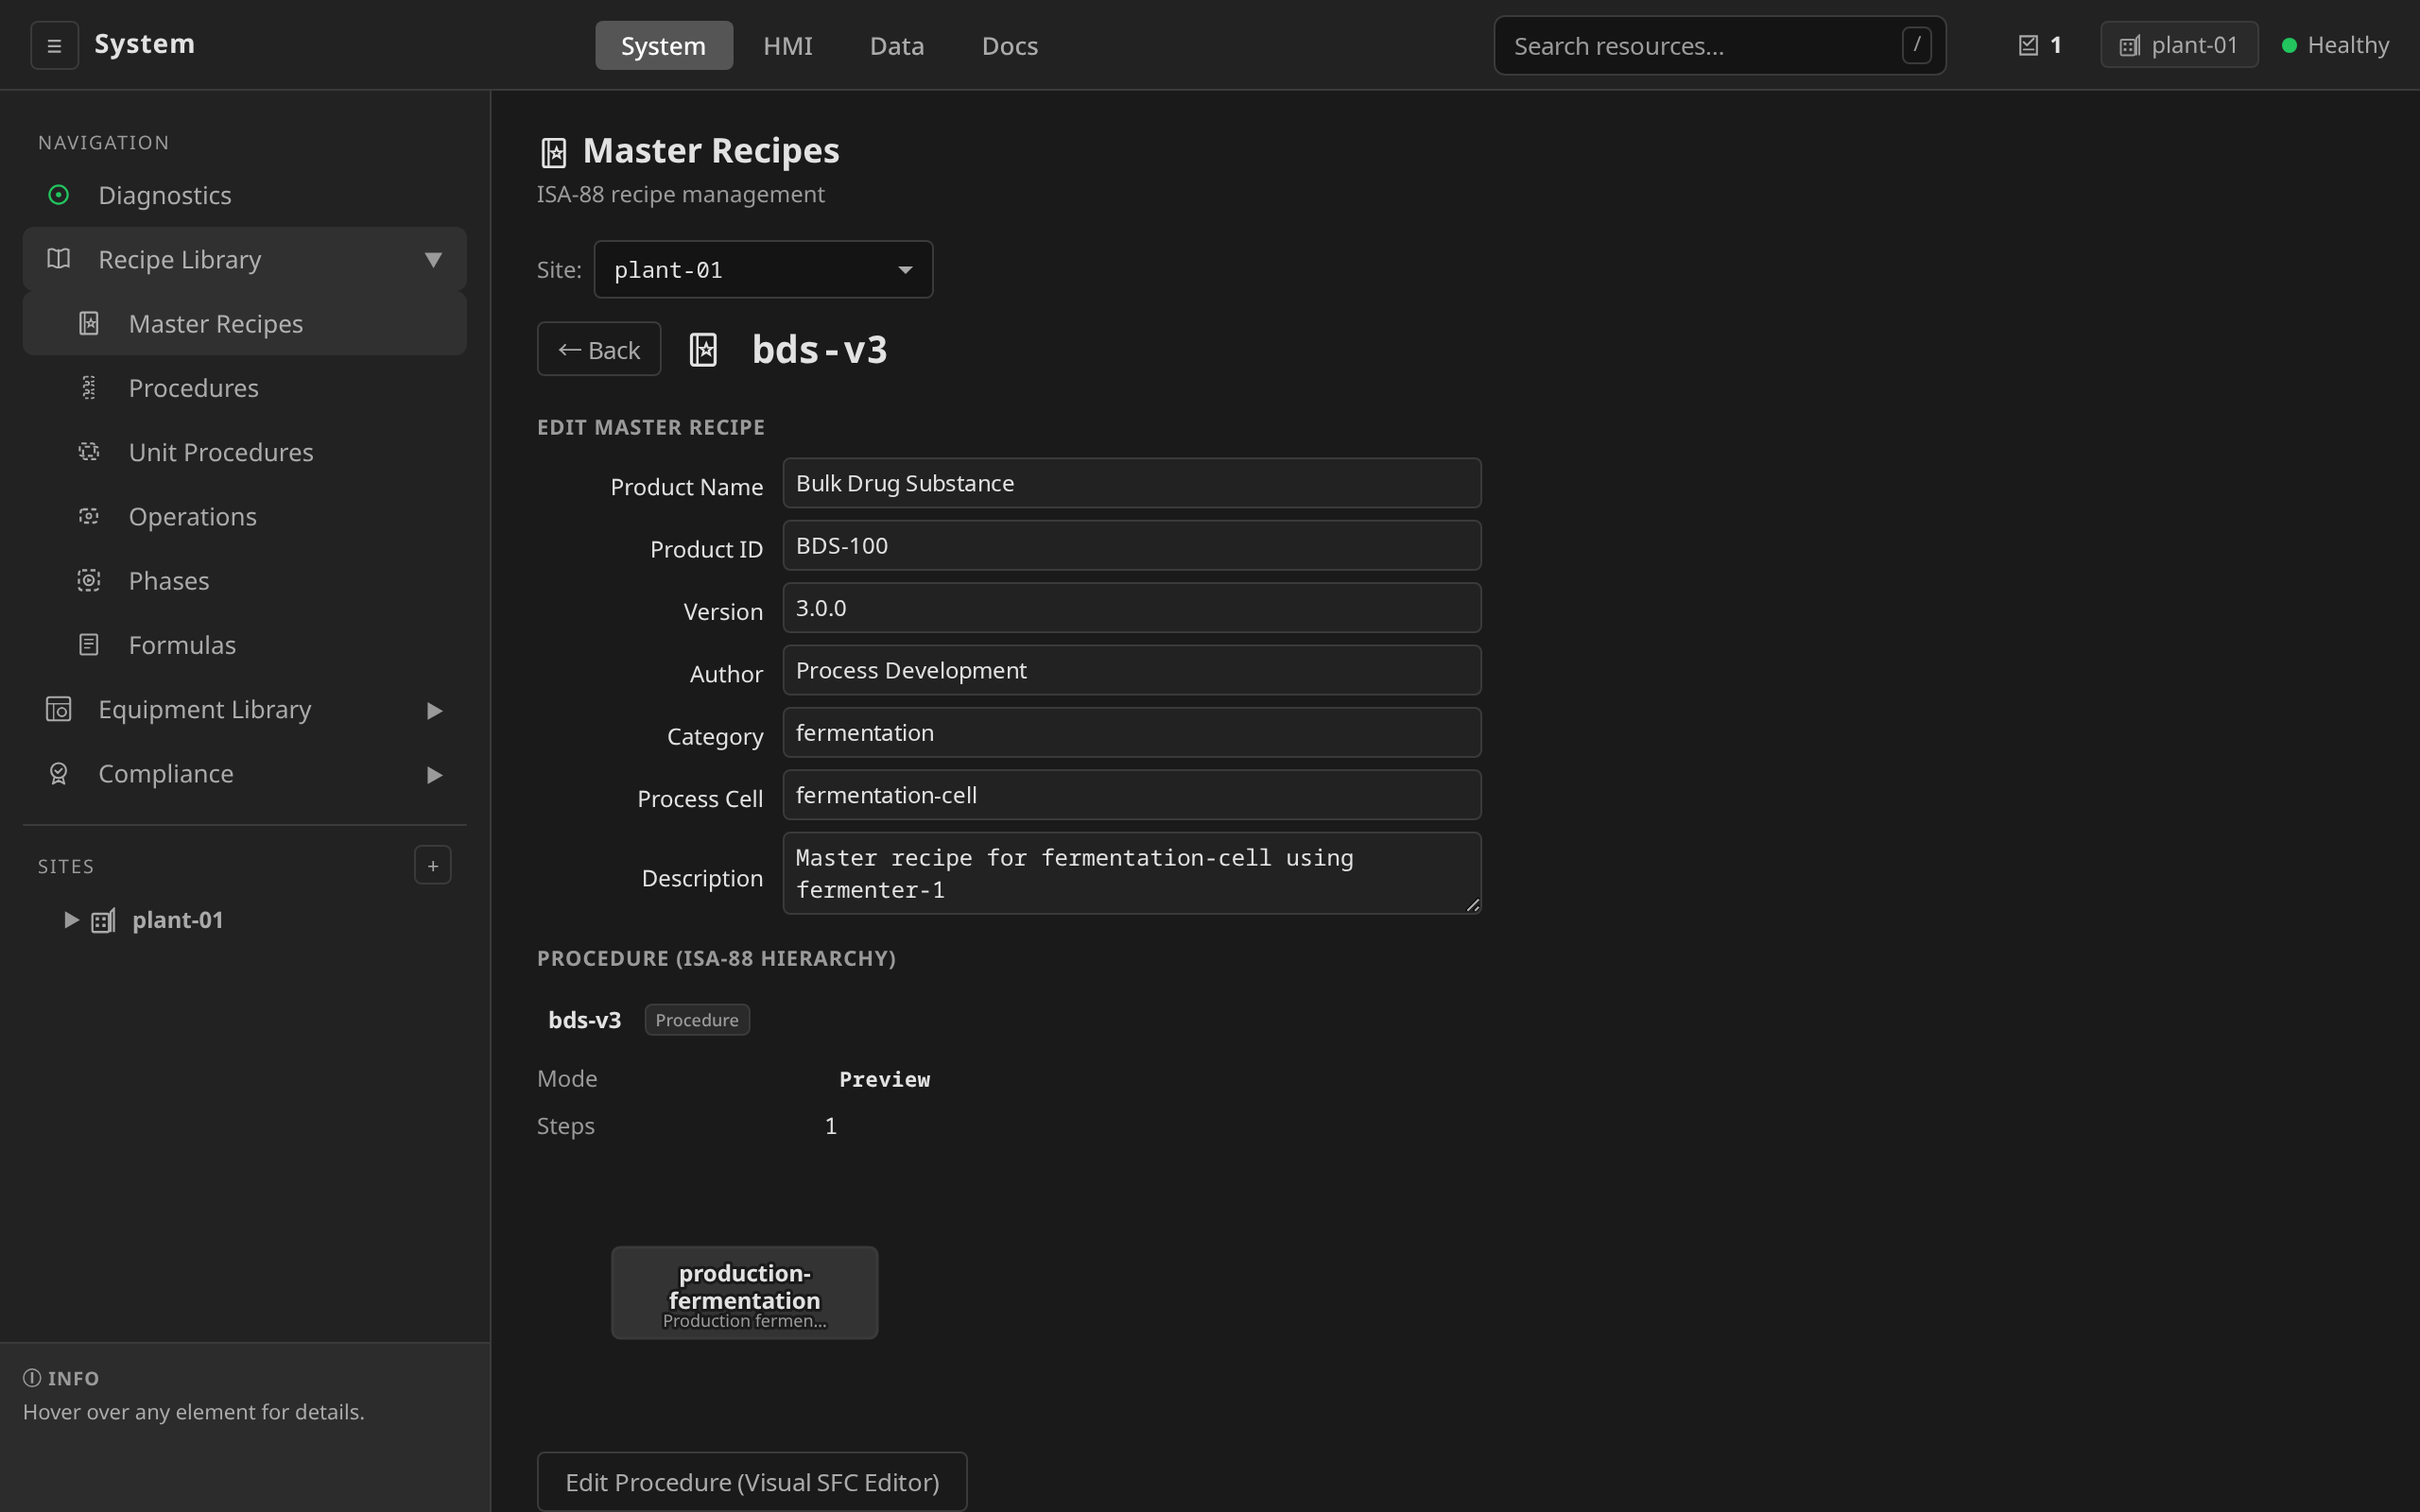
templateRef flagged red at authoring time, fixed from the picker, and the Target section resolving the step's capability to a unit. The parameter panes are covered on Parameter Binding.
# tank-mix-mod-test.yaml
apiVersion: recipe.dcs.io/v1alpha1
kind: MasterRecipe
metadata:
  name: tank-mix-mod-test
  namespace: site-riverbend
spec:
  description: "Test the modulating tank-mix variant"
  productName: "Test Mix"
  productID: "TEST-MOD-001"
  version: "1.0.0"
  header:
    batchSize: "800"
    batchSizeUnit: "L"
    minBatchSize: "100"
    maxBatchSize: "1400"
  targetProcessCell: sim-cell
  targetUnits:
    mixing: mix-tank-1b           # uses the clone unit from Step 7
  parameters:
    - name: fillLevel
      type: REAL
      defaultValue: "800"
      minValue: "50"
      maxValue: "1400"
      engineeringUnit: "L"
    - name: agitatorSpeed
      type: REAL
      defaultValue: "50"
    - name: mixDuration
      type: TIME
      defaultValue: "1m30s"
    - name: drainLevel
      type: REAL
      defaultValue: "5"
  procedure:
    chart:
      initialStep: mix
      steps:
        - name: mix
          templateRef: tank-mix-modulating
          templateKind: PhaseTemplate
          targetCapability: mixing
          parameterBindings:
            fill_level: fillLevel
            agitator_speed: agitatorSpeed
            mix_duration: mixDuration
            drain_level: drainLevel
      transitions: []
Apply:
dcs apply -f tank-mix-mod-test.yaml
Approve:
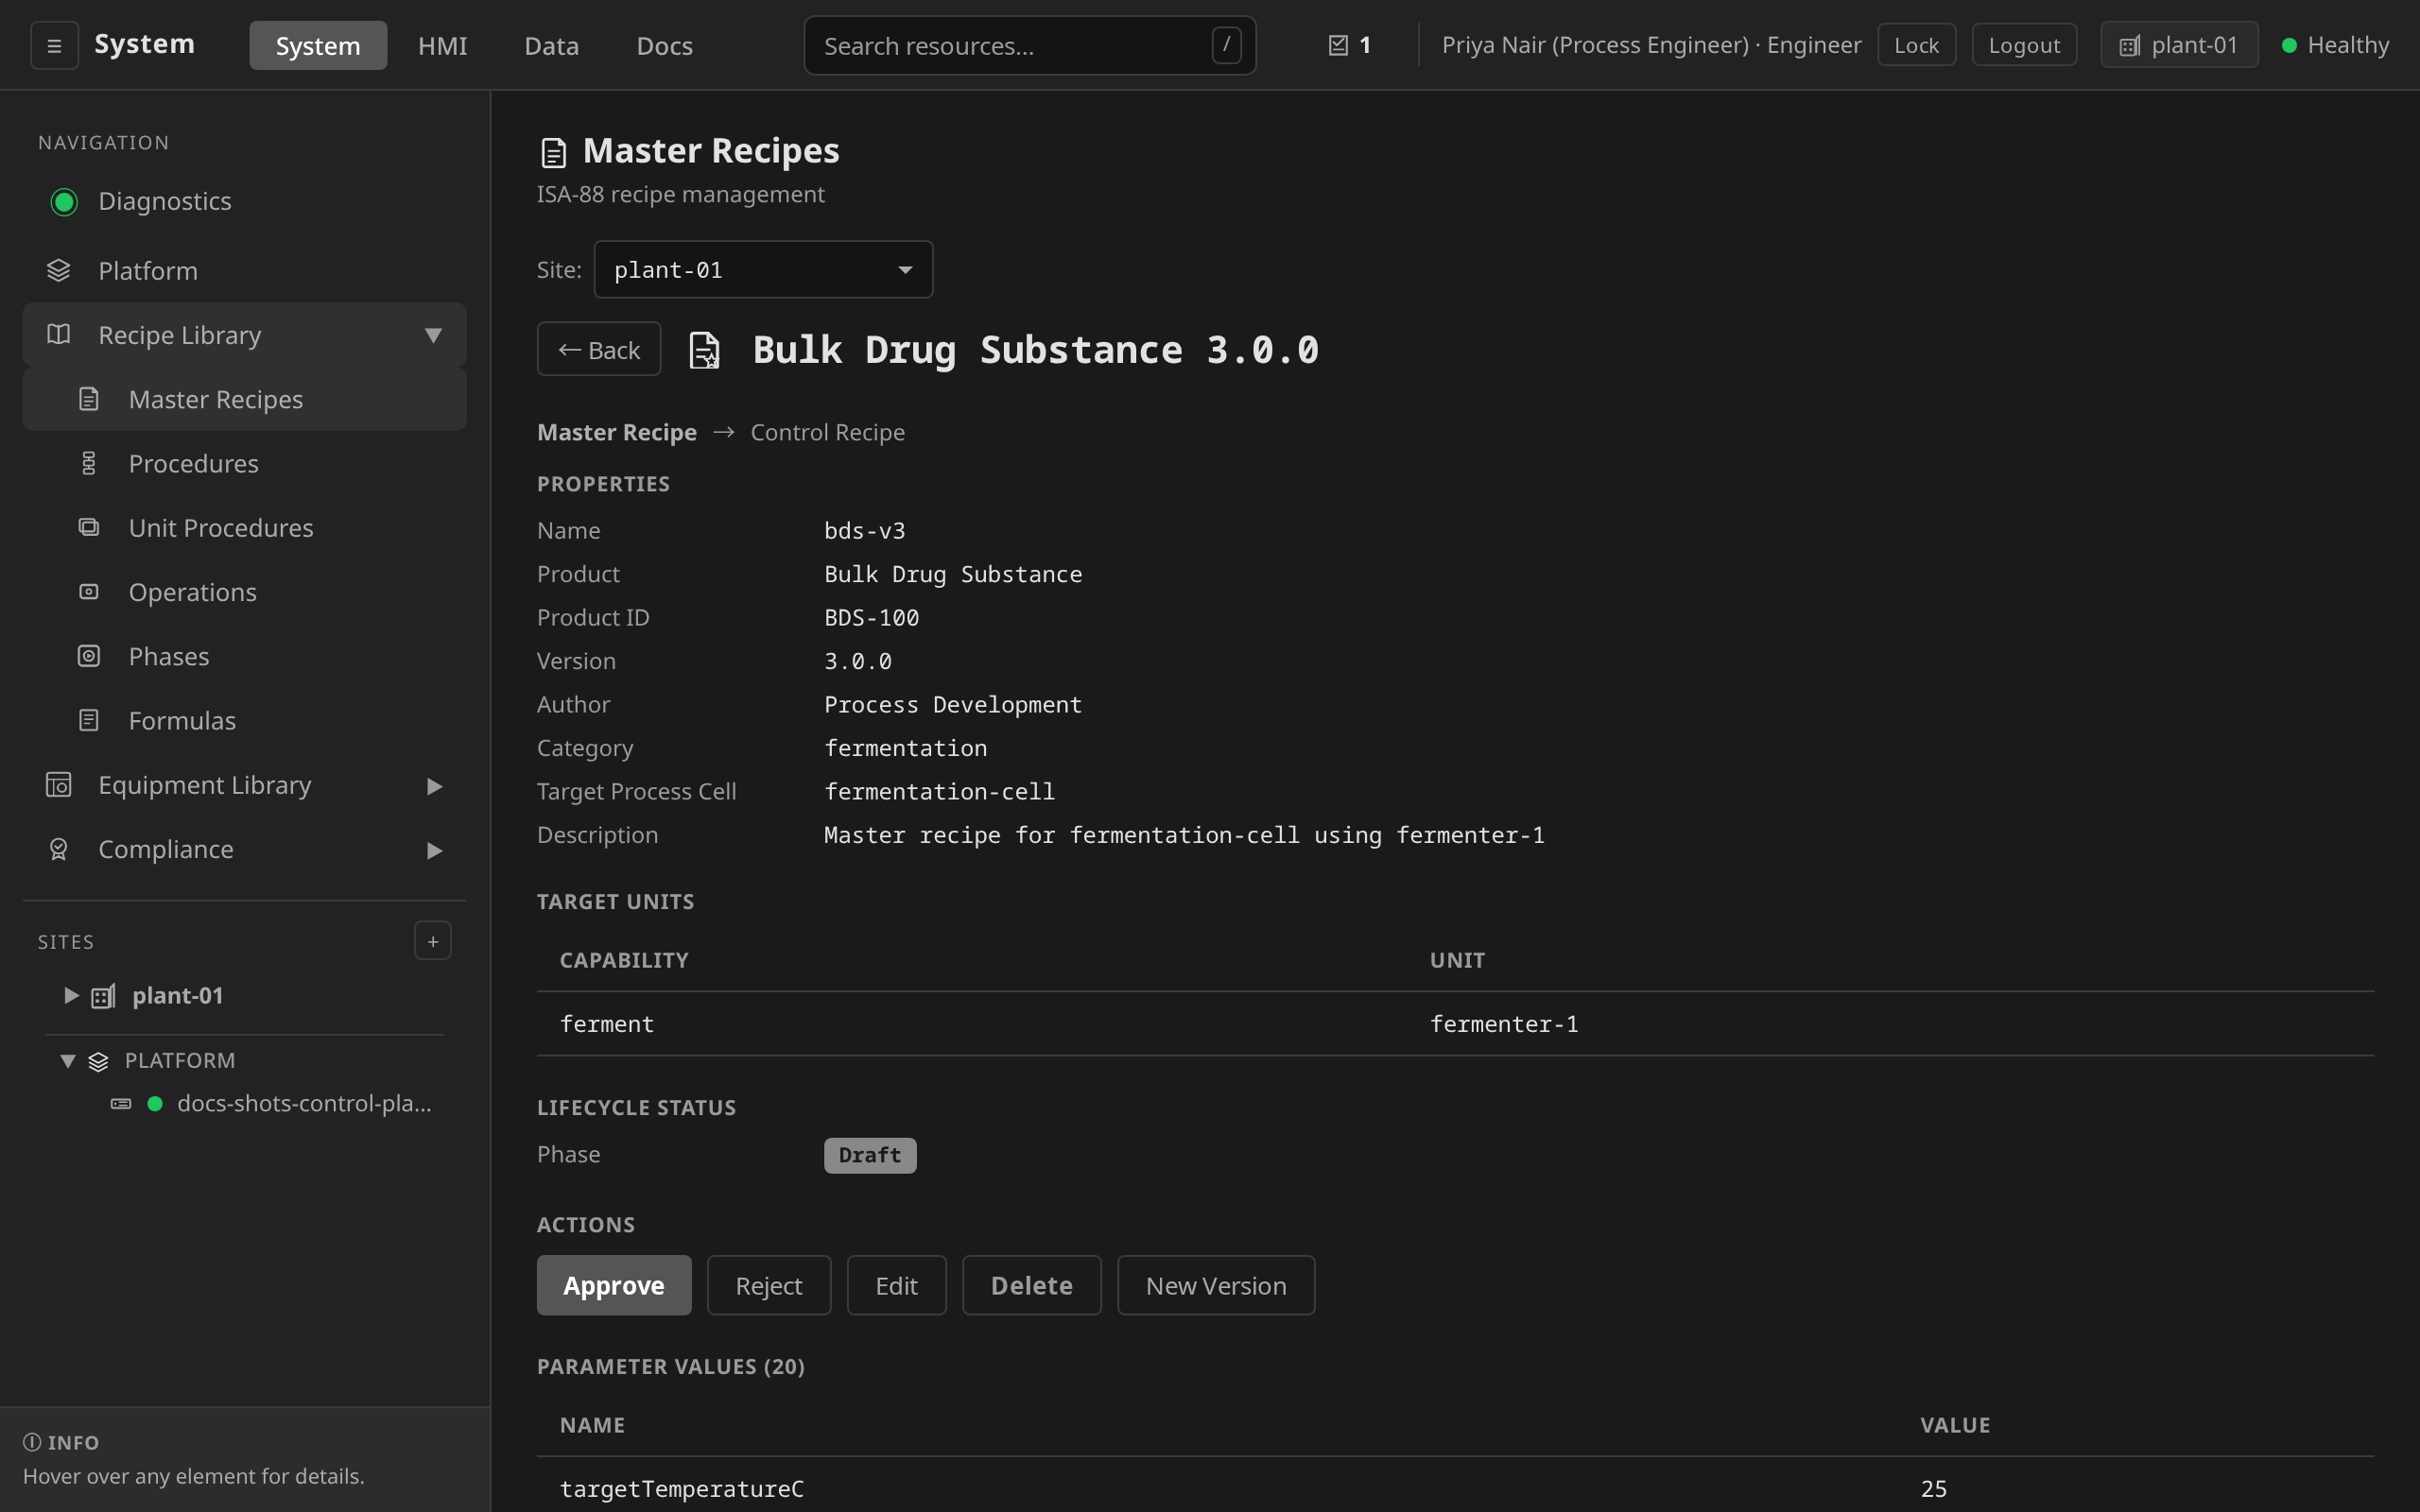
Open tank-mix-mod-test from the Recipes list, click Approve,
enter a reason in the dialog, and confirm. The lifecycle state
transitions from Draft to Approved.
dcs recipe approve tank-mix-mod-test
Step 9: run a batch and watch it execute¶
Start a simulation batch against the new recipe. dcs simulate
creates a simulation Batch, waits for it to finish, and cleans up
(pass --keep if you want the Batch to stick around):
/hmi → Batch Execution → + New → Batch →
pick tank-mix-mod-test from the recipe list → accept the
default formula values → Start. Watch the procedural tree
cascade on the batch detail page. You'll see the new slow-fill
step appear in the tree, the visual confirmation that your
adaptation worked. Hover an SFC node to see its live action
status.
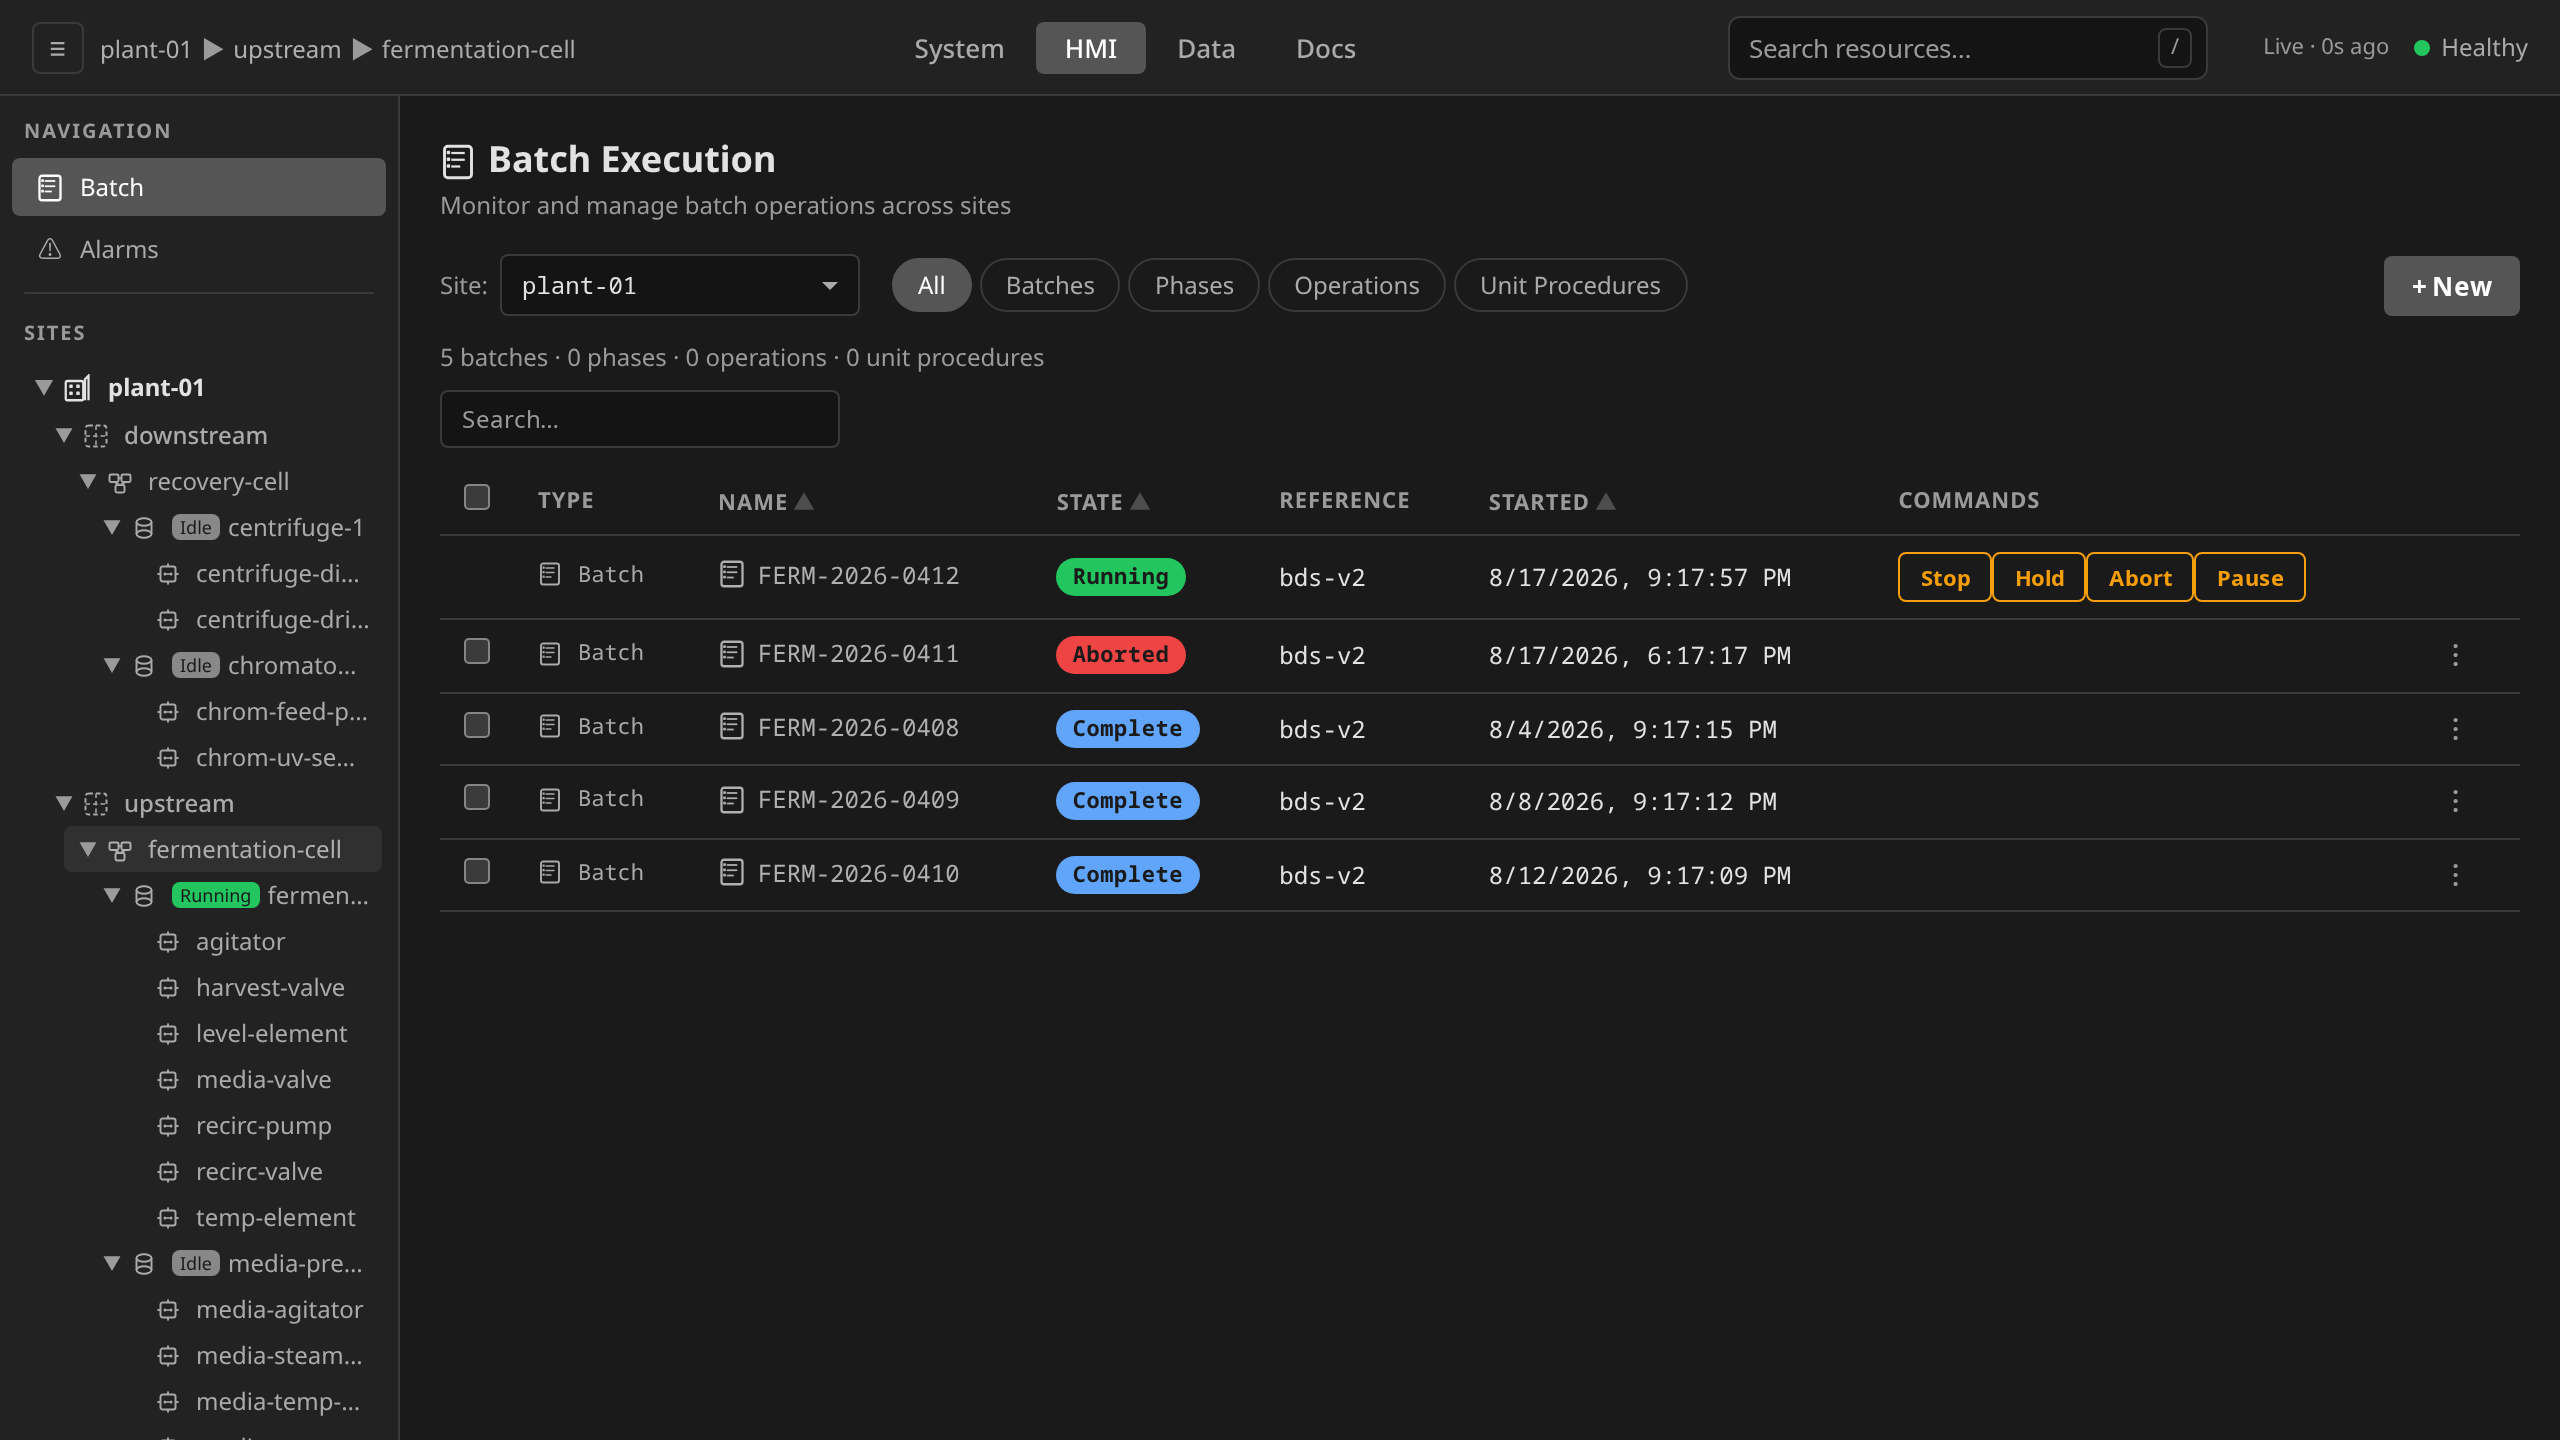
tank-mix-mod-test the same tree carries your new slow-fill step.
dcs simulate tank-mix-mod-test --keep
While it runs, open another shell and watch the procedural tree stream live:
dcs watch states --unit mix-tank-1b -i 2s
apiVersion: batch.dcs.io/v1alpha1
kind: Batch
metadata:
  name: tank-mix-mod-test-run-1
  namespace: site-riverbend
spec:
  batchID: tank-mix-mod-test-run-1
  masterRecipeRef: tank-mix-mod-test
  simulation: true
Apply with dcs apply -f. Note that this will execute
immediately. Prefer dcs simulate for throwaway test runs, and
reserve raw Batch manifests for production. Never bulk-apply a
directory of Batch YAMLs.
You should see the batch move through these states:
- The
mixstep starts. - The
tank-mix-modulatingphase begins onmix-tank-1b. - The phase walks through
open-inlet→filling→slow-fill→close-inlet→confirm-fill(operator prompt) → ... →done.
If the phase gets stuck on filling, pull a runtime snapshot and
compare mt1-level-sensor.PV against mt1b-inlet-valve.CMD:
/data → Trends → add both mt1-level-sensor.PV and
mt1b-inlet-valve.CMD to the chart over the batch window. The
valve command should step from 100 → 50 → 0 while the
level rises monotonically. A flat level with a non-zero command
is the classic "written to the wrong channel" symptom.
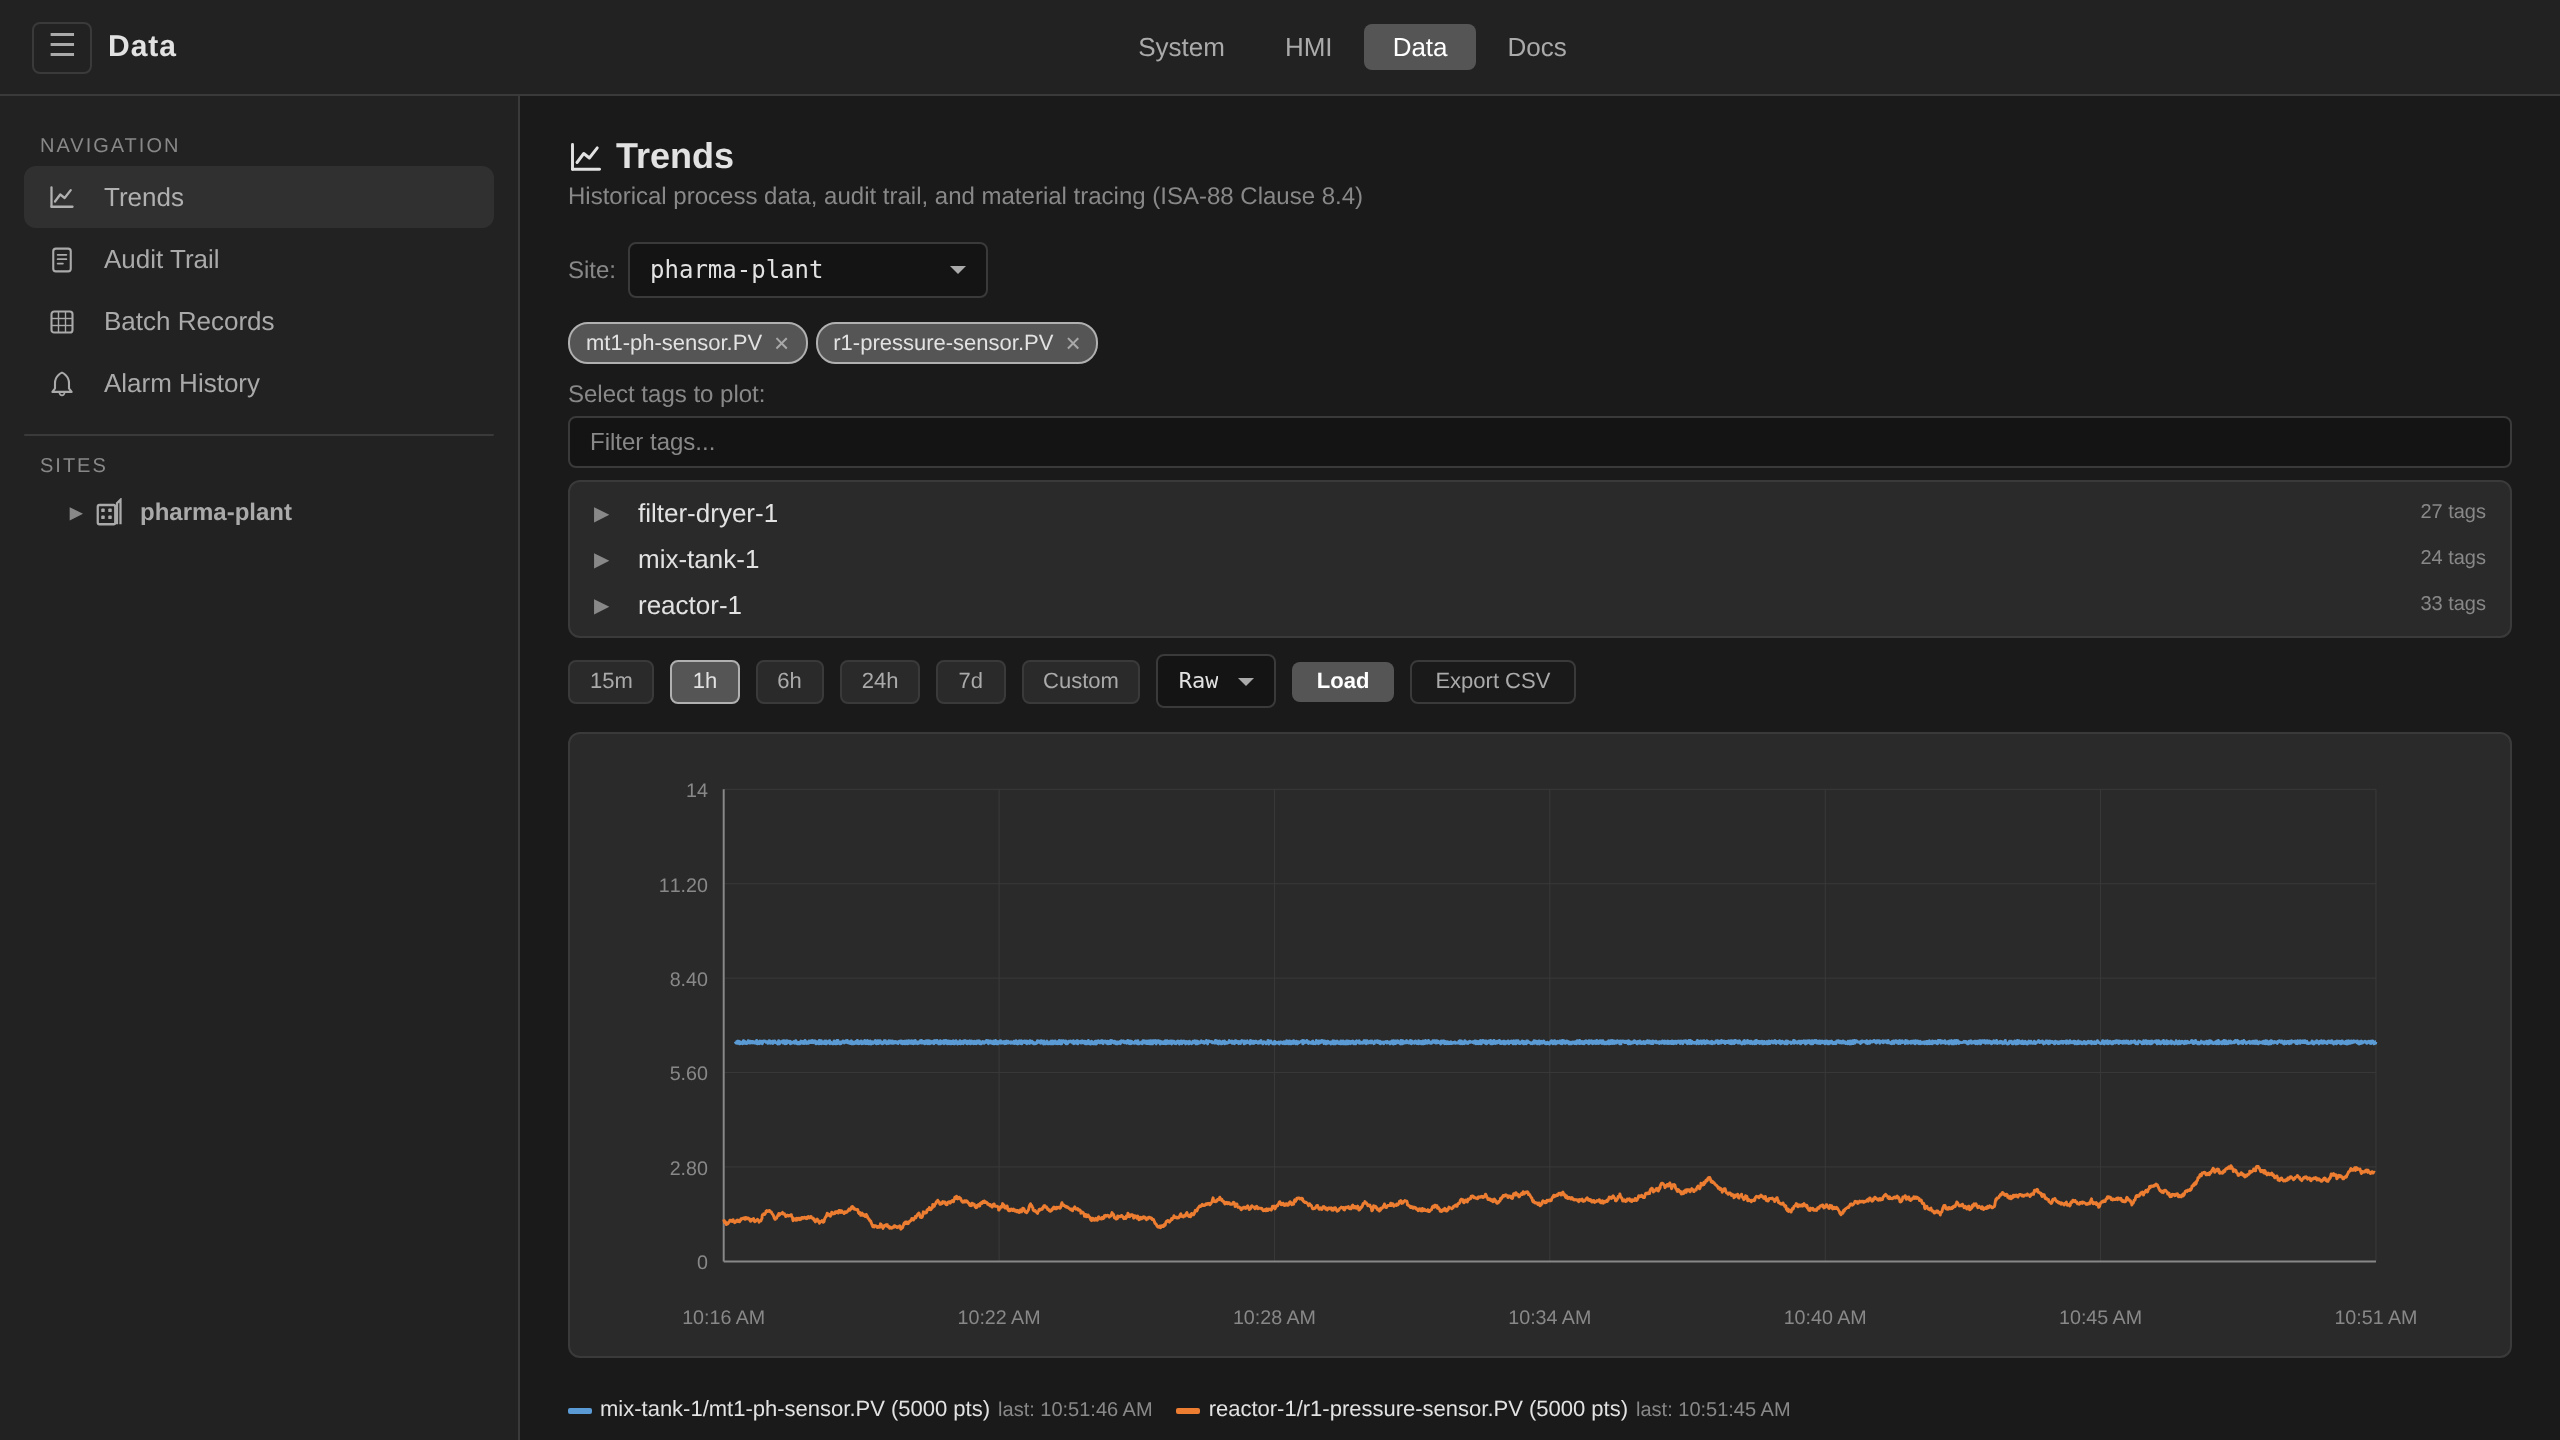
mt1-level-sensor.PV against mt1b-inlet-valve.CMD the same way and reads the two curves against each other.
dcs get runtime --unit mix-tank-1b
dcs get mt1b-inlet-valve.CMD
The most common failure is that tagBindings on the new
ControlModule write to channels the simulator doesn't translate into
a level sensor reading, so the level never rises and the guard never
becomes true.
Step 10: tear down¶
If this was just an experiment, roll the five new resources back. The UI offers a row-action Delete on each one. The CLI covers everything except the Template kinds (PhaseTemplate / OperationTemplate / UnitProcedureTemplate), which still fall back to kubectl.
- Abort the batch if it's still running:
/hmi→ Batch Execution → opentank-mix-mod-test-run-1→ Abort → enter a reason and confirm. - Delete the master recipe:
/system→ Recipes → opentank-mix-mod-test→ Delete in the ACTIONS panel. - Delete the unit:
/system→ Equipment Library → Units → row-action menu onmix-tank-1b→ Delete. - Delete the control module:
/system→ Equipment Library → Control Modules → row-action menu onmt1b-inlet-valve→ Delete. - Delete the phase template:
/system→ Equipment Library → Phases → row-action menu ontank-mix-modulating→ Delete.
Each Delete pops the same confirm-delete modal. It spells out what will be removed, and you type the resource name to confirm.
# Abort the batch if still running (reason required for irreversible commands):
dcs command Batch <batch-name> Abort --reason "cleanup"

# Delete the resources that have dcs delete subcommands:
dcs delete masterrecipe tank-mix-mod-test
dcs delete controlmodule mt1b-inlet-valve
dcs delete unit mix-tank-1b
PhaseTemplate, OperationTemplate, and UnitProcedureTemplate don't
yet have dcs delete subcommands. Remove the new phase template
via kubectl until the CLI catches up:
kubectl -n site-riverbend delete phasetemplate tank-mix-modulating
tank-mix, mix-tank-1, and the original reference-plant recipes are
untouched. Adding a parallel unit and leaving the existing one alone
is the whole point of Option B in step 7 (clone the unit).
What you just did, in ISA-88 terms¶
You created a new PhaseTemplate (a new class), instantiated a
new ControlModule on a cloned Unit (new instances), wrote a
new MasterRecipe that targets the clone unit's mixing
capability, and ran a new Batch through it. The old templates,
unit, and recipes still work, and the new ones work in parallel. This
is the core adaptation pattern: clone, rename, bind, run.
For more details on the recipe lifecycle (master recipe → control recipe → batch), see Recipes. For the parameter-binding mechanism specifically, see Parameter Binding.
Common pitfalls¶
| Symptom | Cause | Fix |
|---|---|---|
Recipe's BindingsResolved condition is False (or batch fails) with "requires moduleType analog-control but unit … binds it to ControlModule … of moduleType discrete-valve" |
The target unit's cmRoles.inlet_valve points at a discrete-valve CM but the template requires analog-control |
Either rebind Unit.spec.cmRoles.inlet_valve to an analog-control instance (Option A in step 7), or target a different unit whose cmRoles already point at an analog-control CM (Option B) |
Phase transitions to filling and never advances |
Tag bindings on the new ControlModule write to channels the simulator doesn't translate to a level sensor reading | Check tank-sim IOModule channel mapping; pick a channel the agitated-tank SimulationPreset (or an inline spec.simulation.behaviors override) actually drives |
| Over-fill during a run even though the recipe looked "in range" | dcs recipe approve does not enforce minValue/maxValue on formal parameters today — out-of-range values are accepted |
Add an AlarmDefinition on level_sensor.PV with exceptionAction: Stop as the runtime safeguard |
| New phase doesn't appear in Equipment Library after apply | Browser cache | Hard-refresh (Ctrl+Shift+R) the gateway tab |
Batch starts but inlet_valve.CMD doesn't move |
Wrote to the wrong tag — modulating valves use CMD (REAL) not state (BOOL) |
Double-check the analog-control template's tag list — see analog-control |
For more failure-mode patterns at the phase level, see Phases.